Audio Mangling through Slicing: Slice Markers Explained
Sample slice markers were added to Renoise in version 2.7. In this article, I will go into a little bit more depth about what they are, how they work, and some interesting uses you can put them to. So if you haven't yet familiarised yourself with this feature, read on.
Before starting, it helps to have a MIDI keyboard hooked up to Renoise. But if not, triggering notes from the computer keyboard will of course work as well.
What's a Slice Marker?
Here's what the slice markers look like.

At first glance, they might appear to be some sort of warp/stretch markers, but appearances deceive. Slices do not warp or time-stretch the audio in any way, they are simply trigger points within a sample.
The most obvious use for them is to chop up a beat. Both the hip hop and drum & bass genres are almost entirely built on this technique. Load up a drum loop and hit the  button in the toolbar above the sample waveform display. Renoise will now try to detect the attack of each individual hit in the sample. Since there is some guesswork involved, this process is not always 100% accurate. Should that happen, you can always adjust the created slice markers manually by dragging them, adding new ones by enabling the
  button or delete them by double clicking (alternatively select a bunch and hit Del on your keyboard).
If you get too many or too few markers, you can try adjusting the percentage value  next to the
  button. It controls the sensitivity of the beat detection; the higher the number, the more markers are created.
Real-time Triggering
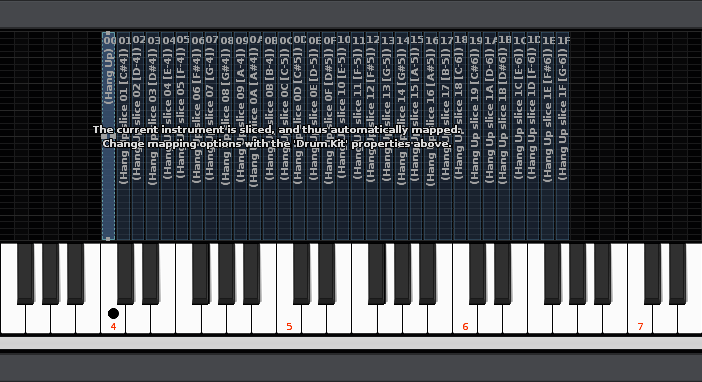
Now to the interesting bit, triggering slices from the keyboard. Move over to the Sample Keyzones tab. You should now see something like this.

As soon as you add a slice marker in the Sample Editor, the Sample Keyzones will switch to Drum Kit mode and automatically manage the keyzone layout for the instrument. This means that each individual slice will be mapped to its own key on the keyboard. The first zone represents the full beat, while all the rest are assigned to one slice each. At this point, you're all set to create a completely different beat by some judicious hammering on your keyboard to try different combinations out.

By default, Renoise will lay the slices out in consecutive order, using both white and black keys. If you'd prefer to only use the white keys for triggering your slices, click the arrow next to the Drum Kit button in the toolbar above the keyzones display and choose "Use White Keys Only". Then click the Drum Kit (short for "Generate Drum Kit") button and the slices will be repositioned to white keys only. To change the starting key for the slices, edit the note value labelled "from".
When playing a slice on the keyboard, you'll notice that it will stop playing as soon as playback reaches the start of the next slice. If you'd rather the slice carried on playing past the next boundary for as long you hold down the key, head back to the Sample Editor and locate the  button in the top toolbar. This toggles the playback behaviour between stopping at the next slice and continuous play. Which mode you will use depends a little bit on what you're trying to create. If transplanting the original loop into something at a different tempo, it helps to have single-slice triggering enabled, but if not, try and disable it. If you're lucky it might give rise to some hard-rocking syncopated funk.
Sequenced Triggering
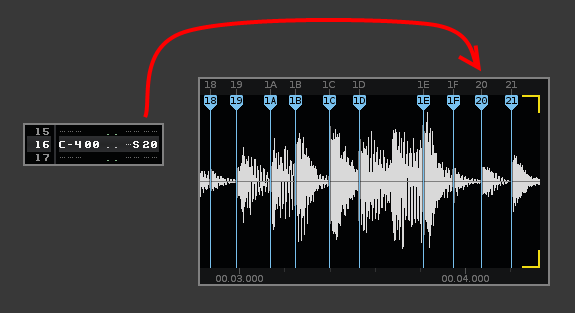
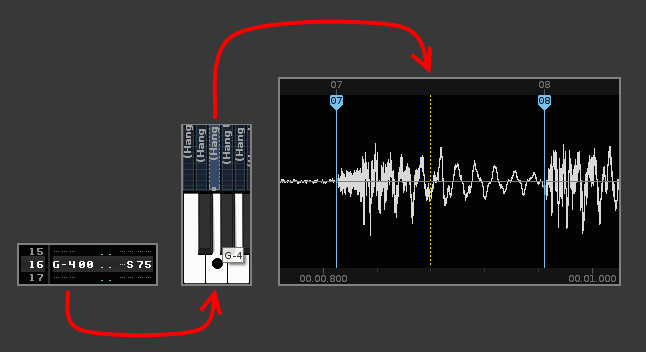
You can of course record your rearranged beat to the pattern using the notes assigned to the various zones, but there's also another way. Renoise has always had the S sample command for triggering samples at an offset, you can read about its traditional use here. For a sliced sample however, the command works differently. Notice the number displayed in the little flag at the top of each slice marker. Use this with the S command to trigger that slice.

Note that you will need to enter the note corresponding to the very first keyzone, i.e. C-4 by default.
If you enter a note corresponding to one of the slices, the S command will then offset into that slice. It will then work just like the S normally does, but only for that particular slice. I.e. the slice will be split into 256 evenly sized chunks which you can jump to by specifying a number between 00 and FF for the S command.

Slices are Aliases
If you now open the Instrument Settings tab and choose the Sample subsection, you'll see that there's an entry in the sample list for each slice. These are not normal samples, but are actually aliases to the sections of the full sample created by the slice markers. These aliases will get updated automatically as you move slice markers around in the main sample. For that reason, you can't edit the waveform of these samples since they are only read-only windows onto the full sample residing in sample slot 00.

If you want to apply any destructive sample edits to one slice only, you can still do this by selecting that slice only in the master sample waveform. To make this easier, turn on Snap and choose Markers from the drop-down. Selections will now snap to slice boundaries, and double clicking while holding down Ctrl will automatically select a whole slice.
You can however edit all the properties of these sample aliases, creating variation by modifying the way individual slices sound. Volume, Panning, Transpose, Loop etc all apply separately to each individual slice. Try setting a loop on some of the slices, or pitching some of them down/up using the Transpose slider.
Should you wish to convert the slice aliases into real samples once you are happy with your cuts, you can do that by right-clicking in the Sample Editor, go to the Slices submenu and choose "Destructively Render Slices". This converts the sliced instrument into a regular multi-sample instrument.
As you move around in the sample list editing properties, you will notice that the sample display changes to show the waveform of only that slice. By default, triggering notes from the keyboard also causes the selected slice to change to the last one triggered. If you find that this gets in the way, there is an option to switch it off labelled "Auto-Select Played" to the left above the waveform display.
Beyond Beats
Going beyond basic beat slicing, slice markers are also useful for a lot of other things. For longer vocal or instrumental takes for example, it's often easier to split the different phrases up with markers instead of chopping the take up into individual samples. That leaves more flexibility for finetuning later. They're also perfect for more radical vocal chopping or general reconstructing effects, which those of you into the sound of Todd Edwards will probably appreciate more than others.
And why stop at vocals or beats? It's great fun to throw in snippets of full tracks, slice them up tightly and then completely reconfigure them. Load up a suitable sample, and before you run the automatic beat detection, enable looping on the original sample. This is because any properties set on the master sample before slicing will be copied over to all of the slices. If you forget this step and want to make all slices loop after you've sliced, you can also select all aliases in the sample list and enable looping in the properties to apply it to all of them in one go. This will create lots of different-length loops which more often than not give rise to interesting rhythmic/melodic effects when triggered in suitable combinations. By loading up a sample from a 70s/80s soul or rock track, looping and sequencing a few short slices, adding a kick and a hihat, you will be able to reproduce the entirety of The Field's early oeuvre in no time.
I hope you'll find the slice markers a source of inspiration for creative sample mangling.
- sharevari's blog
- Log in to post comments


8 comments