Instrument-building: Electric Piano
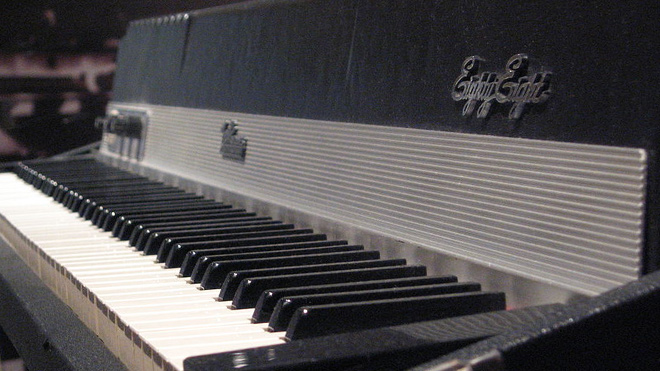
Photo by Roger Mommaerts / CC BY
In this tutorial we are going to create an authentic sounding electric piano in Renoise
Topics covered in this tutorial- How to render samples from a plugin (VST/AU)
- How to layer sounds to create a thick, convincing sound
- How to implement cross-fading between keyzone layers
- How to use velocity-tracking for expressiveness
The electric piano - and its cousin, the electric clavinet - are truly some of the classic instruments of the 20th century. Famous models like the Fender Rhodes (the one that started it all), and later models such as the Wurlitzer and Hohner are recognized all over the world, by musicians of all ages and spanning all genres.
In these instruments, the sound is not created electronically, but rather by a hammer striking a string or pitch-fork like apparatus, with a built-in pickup system amplifying that signal. Essentially, you could describe the electric piano as a cross between the piano and electric guitar.
Unlike the electric organ, which we covered in the last chapter, the electric piano responds to how hard you strike it - the tone becomes stronger and fuller, but still with a consistent tone. This is by definition something we can emulate pretty well in Renoise, using minimal resources.
Before we go through the steps of creating the actual instrument, let’s hear a quick sample of what the finished instrument might sound like (the link will open in a new window/tab):
Electric Piano demo (Doors - Riders On the Storm)
Step 1: Samples! - our basic building blocks
Since this is going to be a sample-based instrument, the first thing we need to decide upon is a good sound source. Of course, we could choose to sample a real-life Fender Rhodes, but I personally don’t have one standing in the corner of my living room (I’m sure someone reading this does, though). Rather, I would like to showcase a really cool feature of Renoise - the plugin renderer. The plugin renderer allows you to "freeze" the output of a plugin, creating a sample-based version at the push of a button. As the most suitable candidate for rendering our samples, I have chosen a plugin called Pianoteq.
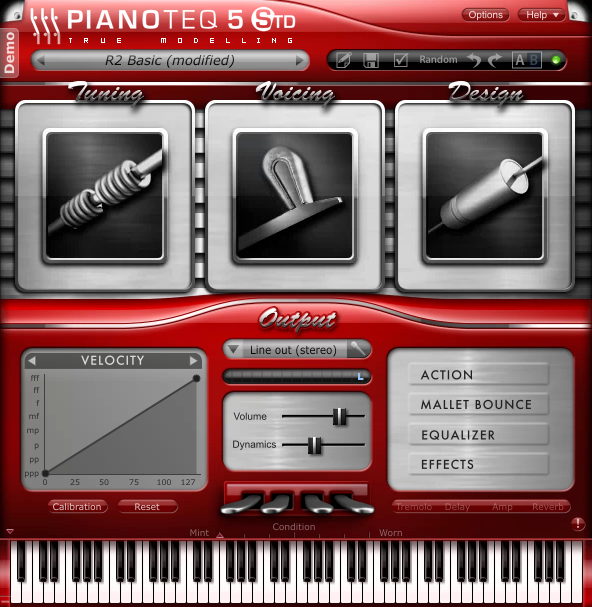
The Pianoteq plugin lookin’ sweet in Electric Piano mode
Pianoteq is a great plugin for creating faithful emulations of a number of different instruments. It specializes in recreating the sound of both modern and historical pianos, but also comes with various percussion instruments installed. You can download the free demo of Pianoteq here.
Once you have installed the plugin (and possibly, rescanned for new plugins in Renoise), Pianoteq should be ready for use. Heading into the instrument list in the upper-right corner of Renoise, you can choose to load the plugin from the list of plugins right underneath (Instrument Properties), or by means of the plugin tab (Plugin).
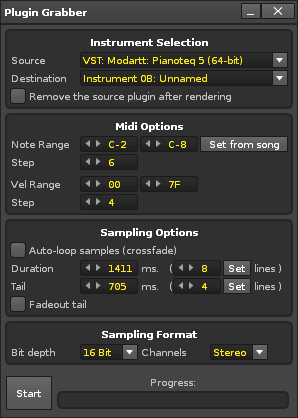
Let’s begin by launching the plugin renderer by right-clicking on the plugin in the instrument list. First, we need to define the pitch & velocity range - this will in turn decide how many steps the keyzone is divided into. In our particular case, the low and high note should be set to C2 and C8, respectively. Tones outside that range are rarely used, and in doing this, we save a little bit of memory / harddisk space. As for velocity, we are interested in capturing the maximum and (almost) minimum velocities of the electric piano. But by default, the plugin renderer is set to just a single velocity level - we want to increase this to 4. Also, the instrument does not radically change its timbre from note to note, so we set the pitch step size to 6 (6 semitones = two samples per octave).
The rendering dialog should now look like this:
If you have not already done so, in the Pianoteq plugin select the Electric Piano “Tines R2 (Basic)” preset, and look for the little switch labelled Reverb (we want to turn off reverb before rendering).
If we hit the Render button, Renoise will start to record the plugin. Note that this happens using the sample rate specified in your audio settings. You might want to match that with the plugin to avoid any loss of quality when converting between rates. In our case, Pianoteq has a setting which allows you choose the desired output in hertz - I have chosen 48kHz, with the renderer set to 16 bit. Normally, 16 bit is fine, but increase this value if you are planning to change the volume of the rendered samples afterwards - the extra bit depth would allows for an increase in volume, with no (perceptive) loss of quality.
Having rendered the plugin, switching to the keyzone should now look like this
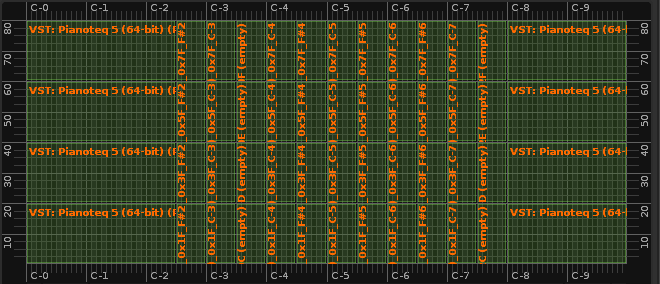
This is how the plugin renderer creates its output - a tiled keyzone map with seven octaves and four velocity levels. When rendering a plugin with multiple velocity layers, the plugin renderer will automatically disable the link between velocity and volume (the VEL>VOL button located in the toolbar underneath the keyzone editor). This is fine, as any rendered sample based on a notes with a low velocity will - most likely - also have a corresponding low volume.
And of course, when choosing our render setting we could have chosen to divide the velocity into even more steps, in an attempt to more accurately capture the character of the plugin - but this is a creative decision we are going to make: we are not really interested in a sound which is divided into 4, 8 or 16 velocity steps - rather, we are aiming to emulate the sound at all possible steps, using the minimum and maximum velocity levels as our “opposite poles” that we then crossfade between.
Because of this, we are now going to remove the second and third velocity layers from our rendered sample, keeping only the lowest and highest ones intact:

Note: I am using the SHIFT modifier to select multiple keyzones between mouse clicks
If you are now asking ‘but why didn’t we just render with two velocity levels in the first place?’, consider that the velocity levels are distributed equally. So, by rendering four levels we got samples with 25, 50, 75 and 100 percent velocity. By keeping the 25 and 100 percent levels, we got approximately the right velocities (with the right “timbre”) for our particular purpose.
Also note that the keyzones going from F#3 to B-3 might be empty. There is nothing strange about this, as the demo version of Pianoteq will skip certain notes. You probably want to delete those samples and resize the neighbouring zones to cover the “missing spot”.
Step 2: Adjusting the sample properties
It's always good to check the levels before you render a bunch of samples. But, even if our levels were good for the electric piano at peak volume, it is of course an entirely different story for the samples we rendered at the lower velocity - right now they sound fine, but once we add our own velocity response curves, the volume would become too low.
A good way to boost the volume for a selection of samples is to apply it to the properties of the sample (anywhere between -INF and +12dB). This is easy - from within the keyzone editor, drag the mouse across the lower part of the keyzone to select those samples. Now you can “batch-apply” the new velocity by choosing a different volume in the Sample Properties:

What’s nice about applying the volume to the properties of a sample is, that you are not changing the actual waveform data - the values specified in the sample properties only applies when the sample is being played.
At this stage, you could also consider looping the samples. In the example instrument, I have done this - it saves a little bit of memory/disk space, and allows you to have an sustaining sound (which is not totally realistic for an electric piano, but a nice thing nevertheless). But note that this step would be entirely optional - to create a good sample loop is an art and science in itself (and one which I am going to cover in my next article, btw.).
Step 3: Preparing modulation
With the basic ingredients in place, it's time to add modulation. Look at the following graph, and you will see that we are going to create two modulation sets: one called pp (pianissimo - very softly), and one called ff (forte-fortissimo - very loud).
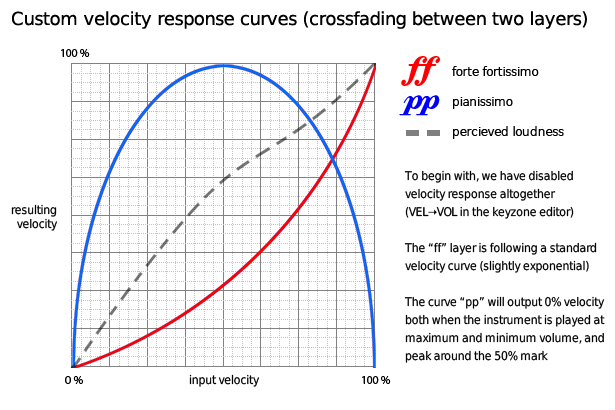
Therefore, we need to create two modulation sets, and apply different modulation to each of them. Again, we can select the samples in either the high or low part of the keyzone by dragging the mouse along the horizontal axis. Having selected the topmost samples, you can now choose Mod: Create and assign new. in the sample properties panel. Provide a name (ff) and repeat this process for the bottommost ones, adding another modulation set called pp.
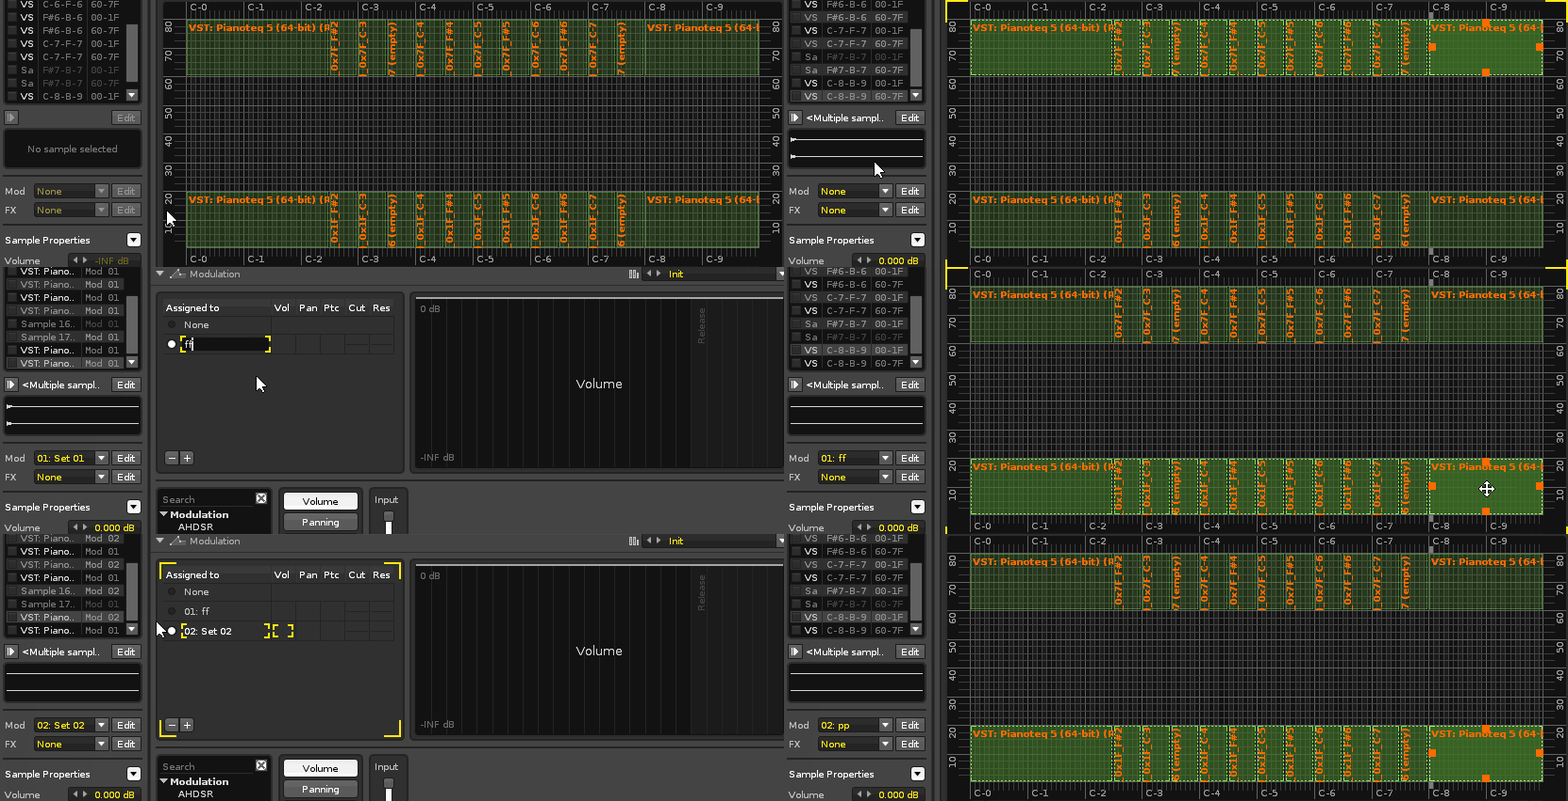
Now we have the samples nicely divided into two modulation sets, and are almost ready to begin with the really interesting part: adding the modulation devices. But first, we need to make sure the two layers overlap each other.
Repeating the process from before, we drag the mouse horizontally to select the topmost samples*, and then, using the resize handle, we expand the range so that it covers almost the entire range, from 7F to 01. The same is done for the bottommost samples, but in the opposite direction - expanded upwards from 00 to 7E.
* Hint: If there isn’t any room for dragging the mouse (the keyzone being full), you can make room by resizing the two zones at the very left side. See also the picture below.
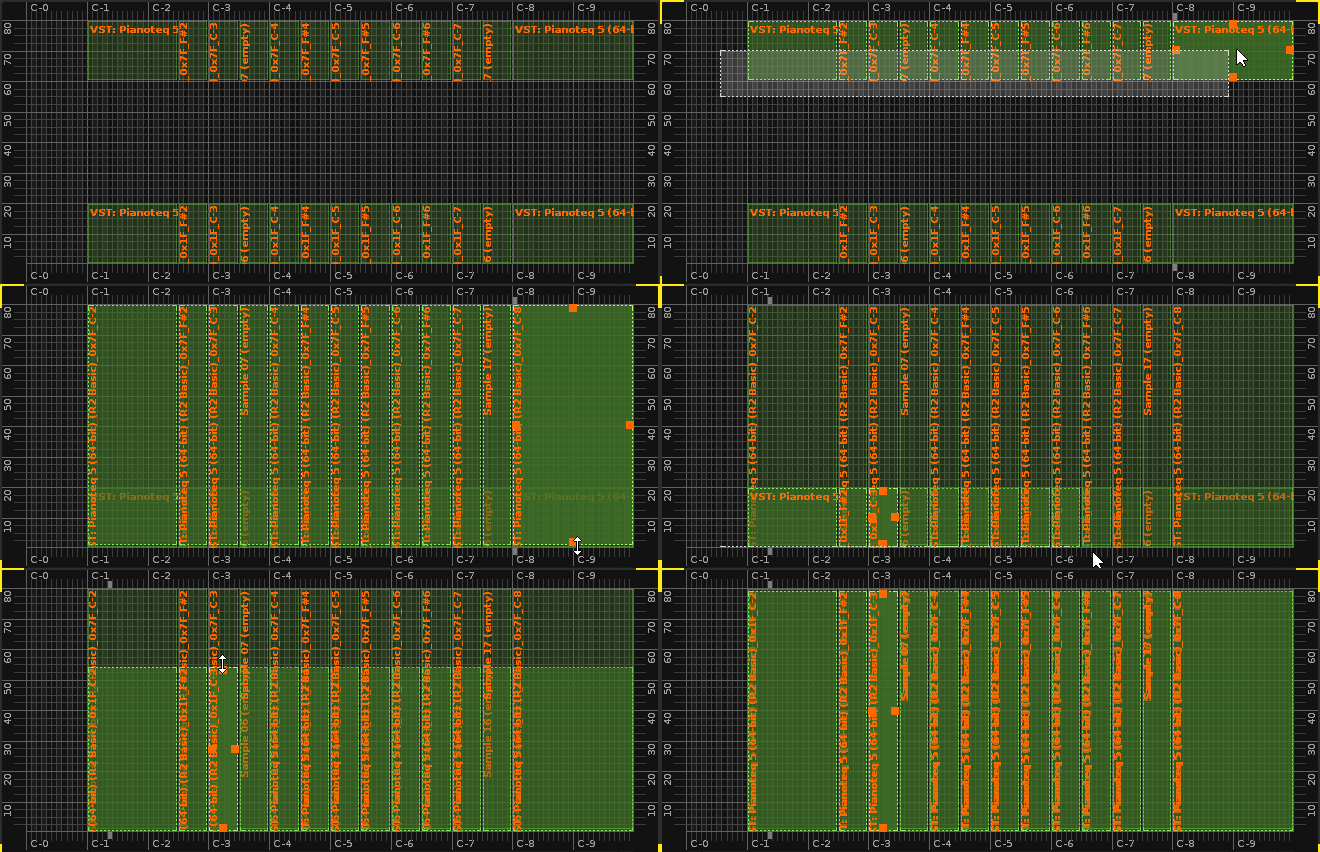
Making the upper and lower velocity levels overlap each other
There are two reasons for not making each layer cover the entire velocity range:
- If we are playing our instrument at full velocity, the quiet (pp) layer does not need to play (and vice versa for the ff layer). This will potentially save a little bit of CPU.
- Leaving a bit of space makes it possible to select samples via the keyzone and not just via the sample list (as you can see in the animated gif above).
Step 4: Implementing velocity response
At this stage, whenever we strike a key, the instrument plays two samples, always at full volume. But as long as we are working on just one of the modulation sets, having both layers sounding at the same time is a bit confusing...so let’s start by turning down the volume of the pp layer.
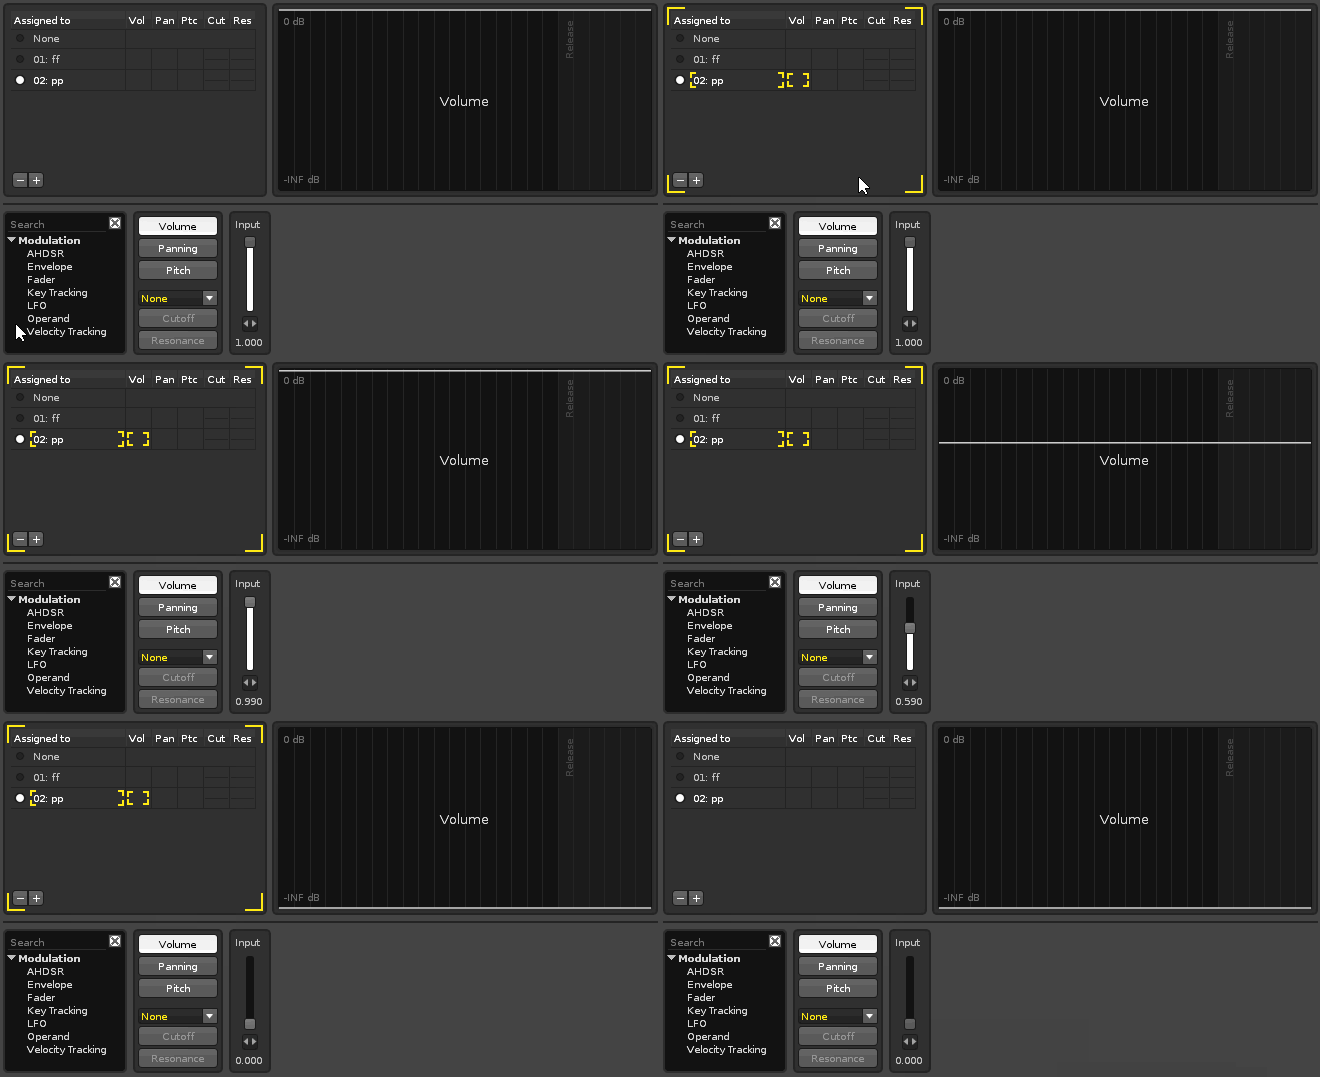
OK, that’s better. Now we only hear samples being played in the loud layer. In the modulation editor, click the ff > volume domain and add not one, but two velocity tracking devices.
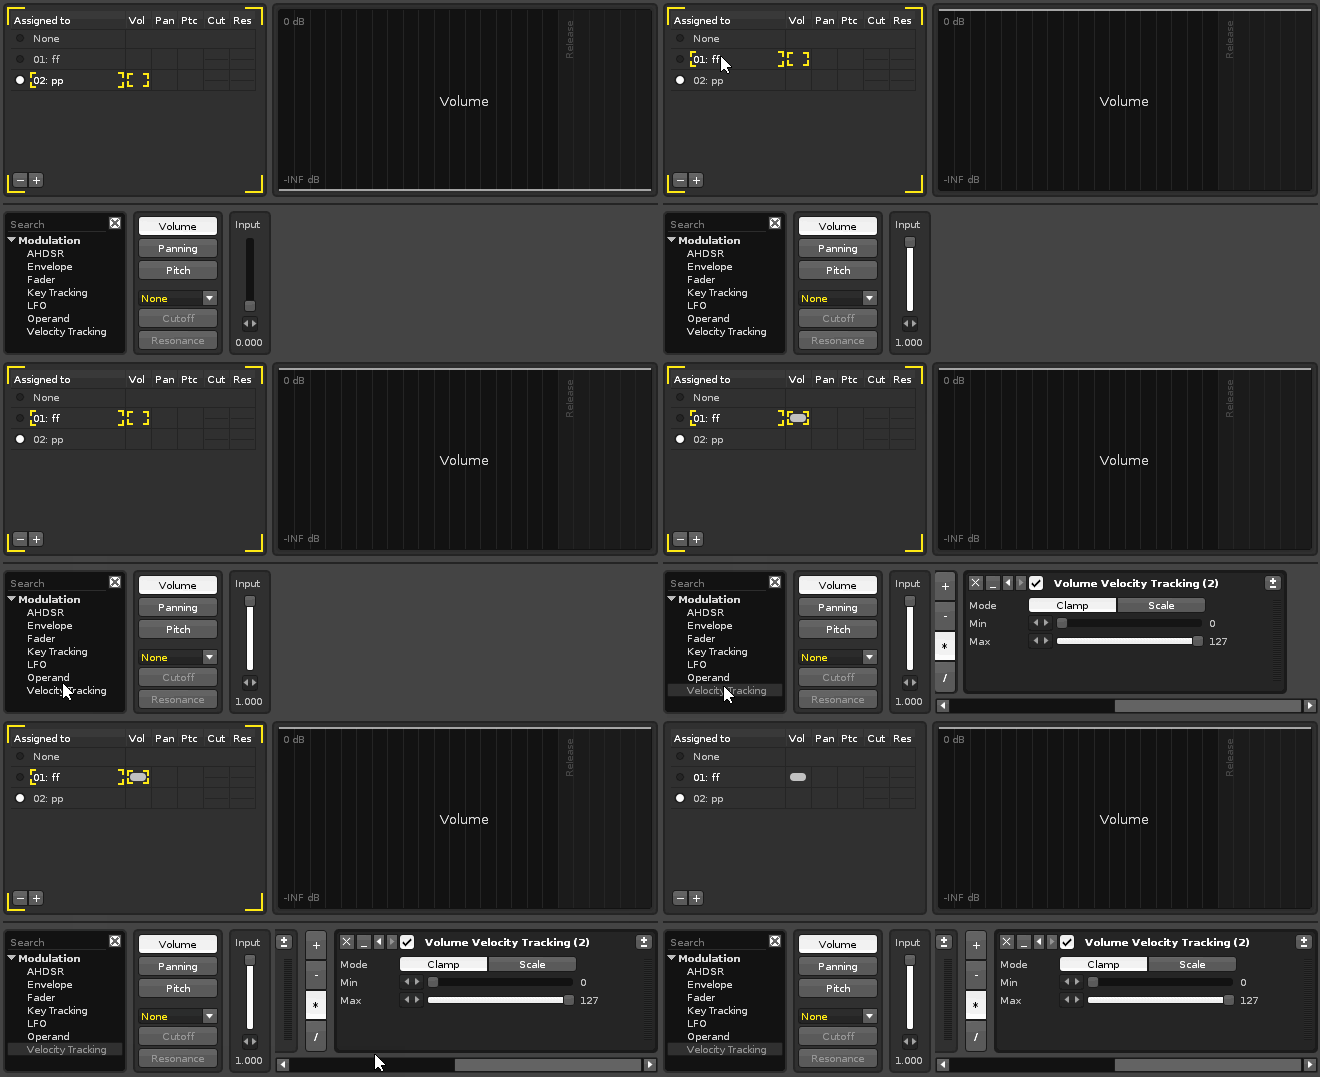
Note: you can double-click to insert the selected device at the end of the modulation set
Actually, in most cases one velocity device would suffice, but as we are looking for a slight exponential curve (and the velocity/key-tracking devices are linear), having two devices loaded with the same settings will achieve just that. Also - in case you looped the samples - don’t forget to add an ADHSR device at the very end, or the sound could potentially keep playing forever.
The ADHSR should only turn down the volume when released, so we want it to sustain at full level and all other controls at zero (but perhaps add a few milliseconds for the release)
To resume, this is what our modulation chain for ff > volume should look like:
[*] Velocity tracker: (default settings - clamp, min = 0, max = 127)
[*] Velocity tracker: (default settings - clamp, min = 0, max = 127)
[*] ADHSR (attack/decay/hold = 0ms, sustain = 1.00, release = 4ms)
Next, we switch to the ff > cut domain. We then choose to enable the LP Moog style filter, a resonant type filter with a good warm character. We want to make the cutoff behave more or less exactly like the Pianoteq counterpart. This might require a little bit of experimentation, but I found the following settings to be useful:
[*] Velocity tracking, set to “scale”, min = 45 and max = 127
[*] Velocity tracking (yes, another one), with default settings
[*] Envelope device with approx. the following curve across 6 seconds
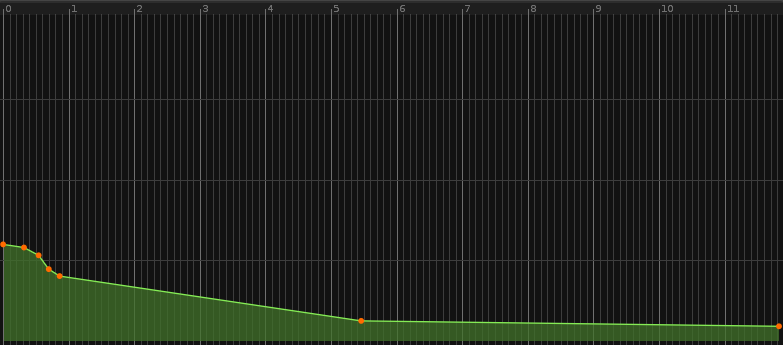
Finally, head into the ff > resonance domain and adjust the Input to just about 0.200.
That’s it for the loud layer - now we want to switch to the pp layer and turn its volume back up (remember how we temporarily turned it down?).
This time, we want to implement a velocity response that fades the volume out at both low and high velocity levels. If we currently play the instrument, the ff layer is sounding good at full volume, but at lower velocities, it lacks “beef”. This is what we intend to achieve - filling out the sound with our pp layer that grows in intensity as the velocity increases from zero to “something”, and then gradually making room for the sharper, stronger ff layer.
This is entirely possible to achieve - we have all the necessary components (modulation devices), we just need to put them together in the right way. Here is our magical custom velocity response for pp > volume
[*] Velocity tracker: (clamp, min = 127, max = 0)
[*] Operand set to 2.00
[*] Operand set to 2.00
[*] Velocity tracker (default settings)
[*] ADHSR (attack/decay/hold = 0ms, sustain = 1.00, release = 4ms)
So, what’s going on here? Well, for starters, the ADHSR device at the end is just there in case we have looped our samples. What’s really interesting is that we start by interpreting the velocity “in reverse” - the first velocity-tracking device makes sure that the harder you hit, the lower velocity becomes. This is what makes the volume fade out as velocity approaches the maximum level. At the other end, the second velocity tracking device is working in the normal way - the harder you play, the louder the sound becomes. As for the two operands sitting in-between - they are simply there for boosting the overall signal - otherwise, the sound would become too quiet.
Now, the instrument should be getting really close to what we want. Try playing it at different velocities, and hear how the sound changes the timbre? Not perfect perhaps, but still a pretty good approximation of what an electric piano sounds like.
Step 6: adding a macro to control falloff
As a finishing touch, we can now add a macro-controlled gradual volume falloff. This is done by adding a fader device to each of our volume domains. The macro can even be abused as a sort of pseudo-tremolo effect. Having a falloff is especially useful if the samples were looped to begin with (or they would never stop).
For the ff > volume domain, insert the fader device before the ADHSR device. Default settings are fine, as we are going to assign “duration” to a macro anyway. Repeat this for the pp > volume domain, also inserting it before the ADHSR device.
Then click the button in the instrument editor toolbar labelled Macros in order to show the macro panel, and hit the little icon next to the first rotary knob. This brings up the macro-assignment dialog.
With the macro dialog visible, we then click the duration of each fader device, and assign each mapping to this range: min = 32.00s, max = 100ms. Adjust the scaling too, and generally find the values that you like the most.

And that’s it. We have created a pretty convincing-sounding electric piano, and hopefully learned thing or two about advanced instrument creation in Renoise. Don't forget to save your creation!
Download the final instrument from here
I would like to extend a thank-you to the makers of Pianoteq, who have kindly given me permission to distribute the Renoise instrument as part of this article.
Next installment: the perfect loop: In the next chapter, I will explain the workflow involved in making high-quality multi-sampled instruments. This involves choosing the right bitrate and frequency, creating the “perfect loop”, and how scripting can make this process less cumbersome.
- danoise's blog
- Log in to post comments


1 comment