Creative Use of Send Tracks
In my previous two articles I have focused on technical matters, but now it is time to take a good look at one of the more creative aspects of Renoise: using Send Tracks. Time to have some fun! Confident use of Send Tracks not only helps you create a clean mix, it also opens doorways to creative sound-design. Another way of saying it: Send Track use holds the key to a lot of classic mixing routines, as well more creative and 'out there' tricks.
Some of you may know these routines and tricks already, but please do read on to refresh your knowledge, perhaps getting your mind to think about new possibilities. For those of you who are completely new to the idea of sends: let's get into it. This article assumes a little basic knowledge of how to use Renoise as well as some common basic audio mixing terms – so if you get stuck on something, read-up first and feel free to ask a question at the end.
I will firstly look into the routing structure of Renoise to demonstrate the basics of how Send Tracks can be used. I will then look at some common and not-so-common send routings using Renoise's internal effects. Finally, I will show how sends can be used to form 'group sends' to apply common effecting. I'll drop in some pointers on how to neatly effect and organise sound so that your work lends itself to a better mix.
Basic Use of Send Tracks
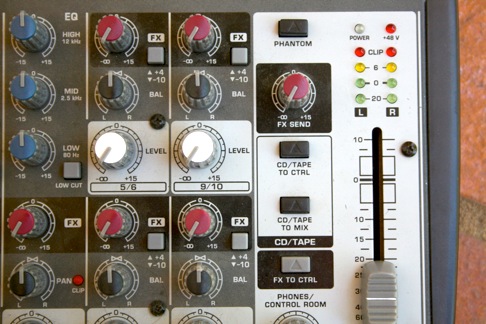
The concept of Send Tracks (or 'sends' for short) is a mirrored concept from analogue hardware mixers. Hardware mixers have individual channels (or a 'track') for each sound – i.e. one channel for the kick, one for the bass, and so on. However, mixers usually have a limited amount of effecting control on each channel, usually just controls like volume, pan, and EQ. If the individual sounds need further effecting then the audio has to be sent from the channel output to external hardware effect units such as tape echo or spring reverb. The sound is altered with effects, then results need to be reconnected to the mixer for mixing and further balancing. Thus, mixers have additional channels labelled as 'effect return channels' or 'receive channels', so that the mix engineer could further adjust the volume, pan and EQ of the effected sound. The overall process can be referred to as routing.

When digital audio came about, programs copied this concept in one way or another. Usually it is just an additional channel or track that you can send audio to for further effecting.
Renoise does this by using Send Tracks, and a routing tool called the #Send Device. If these things seem totally unfamiliar to you then you need to first learn the fundamental facts from the Renoise online manual. See here for the basic Send Track explanation, then the Send Track in the Mixer View explanation, and finally read the #Send Device explanation. That flow diagram with the green lines is a particularly useful one to come back to in understanding how Renoise organises sending:

Let's quickly set up a send routing for ourselves. Open up one of your XRNS files, or alternatively one of the Renoise demo songs. In either the Pattern Editor View or the Mixer View click on the 'Mst' track (the master channel) and press Ctrl/Command+T. This will add a Send Track right next to the master channel. Take note of the Send Track label, it will be something like S01 – you can rename it as you wish, but you need to remember the label when you are routing later.
Next, select one of the active tracks in your song, something obvious like some drums or a prominent melody. On the bottom left of Renoise open the Track DSPs tab and scroll down the list and double-click the #Send Device from the #Routing section. This will insert the #Send Device as the last item on the track's DSP effect routing.

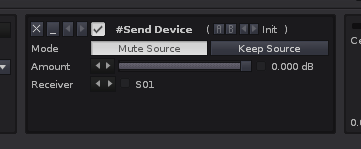
By default the device will be set to Mute Source, the send amount at 0dB (full), and the Receiver usually defaults to the left-most Send Track (e.g. S01). So, as per the previous flow diagram, these initial settings means we are sending all the audio of your selected track to Send Track S01. Because you haven't set up any additional effects, you won't hear any change to the sound, yet.
Now click on the Send Track you have set up (right of the Mst track remember). We'll do a quick proof of concept to show the Send Track in use. From the Track DSPs menu insert the mpReverb effect on the Send Track. First alteration is to set the Dry Mix parameter to 0%, and the Wet Mix parameter to 100%. This will ensure that the effect is outputting nothing but reverberated sound and has no original sound mixed in. It's all wet.

You will hear that your original track sound has become entirely reverberated! Score 10,000 points! *bling!*
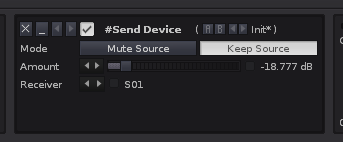
Thus far all the effecting has been in-line: but now we will alter the routing so it becomes parallel effecting. Parallel effecting will show the full routing possibility of Renoise's Send Tracks. So, go back to your original track and focus on the #Send Device. Switch the send mode to from Mute Source to Keep Source. Immediately you will hear the original signal come through the mix dry, at the same time as the reverberated sound. Furthermore, you can control the amount of reverb level directly from the #Send Device by adjusting the Amount parameter. For example, you might find that an Amount of -18dB is just enough reverberation relative to the original sound. Adjust to taste.

In summary, you can now see and hear a parallel effect routing, where a 'wet' reverb sound is alongside a 'dry' input sound. This illustrates the basic possibilities of using Send Tracks in Renoise. Congratulations: you are now an initiate into the art of sending.
In addition, one of the major reasons for using a Send Track is that we can send more than one sound to it. For example, you want four different tracks with four different amounts of reverb echo added to each; then it is as easy as setting up four different #Send Devices, one on each track with individual Amount adjustments. This is a very neat and efficient way of mixing, and can add a unified feel to your mix due to using common effecting across your tracks. Why have four reverb effects when you can just have one? Use a Send Track. This conserves CPU usage as well.
But, we don't need to limit ourselves to a simple reverb routing: in fact, the creative possibilities with send routing is limitless and exciting! Let's explore:
Common Wet Effect Sends
The two most common send routings are for purposes of reverberation or echo. These are 'wet' parallel routings much like the example provided above. Let's look at these common routings closely and see how we can make them optimal.
Continuing with the same reverb routing as above, now focus on the Send Track. Tweak the mpReverb settings to tease out a different sound: Duration of +6000ms; Predelay of 0ms; Low Cut open to 4999hz; Low Gain reduced below -12dB (to filter out low muddiness); Colour Off; Width set to Normal; Pan 7 L (a little to the left); Wet 100% and Dry 0%. Now the reverb is longer and a little more airy feeling.
Have you ever noticed that digital reverb (as opposed to real life acoustic reverberation) sounds lifeless and unconvincing? This problem is especially noticeable with input sounds that are sonically repetitive (like simple drum samples). Well, this problem can be addressed in part by some modulation before the reverberation. To do this, insert the Renoise Chorus DSP into the effect chain, and drag it so it is before the mpReverb effect. Change the Chorus parameters so that it becomes a simple pitch modulator like so: Dry/Wet to 100% (so it is all wet); Rate slowish around 0.4hz; Depth at 40%; Delay at 0ms; Phase to mono; and the rest as is. The Depth parameter will control the amount of pitch modulation and will cause the reverb echoes to have a more liquidised, or organic sound. Colourful reverb!

Next, let's tidy up the reverberated tone. Sometimes a Low Pass (LP) filter can help focus the sound to the mid range frequencies. Add a Renoise Filter3 DSP to the effect chain after mpReverb, select the 24dB Moog curve and drop the cuttoff frequency to around 4700hz or lower to taste. Another common tone alteration is to EQ some of the hazy excess in the mids. Open up EQ5 on the effect chain after mpReverb. Select one of the mid frequencies and set it to 840hz (or thereabouts), set the Q narrow to about 1.20 and reduce around -4dB. Another common reduction point is 2khz but a little less with around a -1-2dB reduction. Or whatever settings to taste, depending on how the input sound is behaving through the reverberation.
Once you have tweaked the parameters to carve out a superb sounding reverberation you can go back to the #Send Device on the original track and re-adjust the send Amount. Hopefully you will find you have a lovely sophisticated reverb effect using entirely native Renoise effects. I've made up an effect chain you can download here and put on your own Send Track that shows this idea in action.
What about some echo? What about some echo?
Send echo (or delay) uses the same approach as above. We want completely wet echo in the Send Track, with possible pre-modulation and tone filtering. Do this first and don't forget it: enable the Mute Src. button that prevents any of the dry signal to sound in the Send Track. If you miss that button then you'll get the dry signal messed into the mix. In this example I'm creating a mono echo sound by using the Line Sync, setting both sides to 6 steps. I love epic echoes, so I'm putting both feedbacks to 72%, and everything else can be left as is.

As before, use the Chorus before the delay to cause a subtle or obvious 'tape wow' pitch modulation effect. Then you can focus on filtering and EQing the echo tone using LP filters and High Pass (HP) filters. Always go back to your original track and adjust the #Send Device Amount to get the mixing level of the echo right. Finally, you can go through all the tracks and your mix, and see what might sound nice sent to the echo Send Track. I've made up an example effect chain you can use on a Send Track to use as a filtered send echo, downloadable here.
Width Effect Sends
Echo doesn't have to be long and epic. Two differing length short delays, panned left and right are commonly used to improve the stereo image of sounds. Here's how to do it. Make up a new Send Track with a Renoise Delay DSP with the Mute Src. button on. Set the L Delay to 7ms and the R Delay to 11ms (these can be tweaked to tune in better with your source sounds). Set the feedbacks to 0% so there is no unwanted resonance caused by the short delay. Now go to the L/R Output Pan sliders and 'swap the channels' by panning the Right all the way left, and Left all the way right. This will mean that stereo sounds will echo off on the opposite side, which is brilliant for creating additive width.

It's generally good practice (although not always all the time) to keep low frequencies out of the sides of the stereo image. In plain-speak, this means little or no bass out on the left or right: just in the middle. Because we've used the Delay to throw echoes of the sound out left and right, then we can tidy up the low frequencies using a HP filter. For this task I tend to like the HP 4n Butterworth filter set at 777hz or above. Additionally sometimes a LP Filter also works on the wide echoes to roll off detail above 13khz or lower. It depends on what part of the sound you'd like to focus in the width. And as always, go back to your #Send Device and adjust the send Amount until it is just so.
You can use the Chorus to achieve a similar width effect in using a Send Track, with the added bonus that you'll get some pitch modulation as well. Replace the above Delay with the Chorus effect and set the Dry/Wet parameter to 100%. Tweak the settings to taste: the key attribute that makes the sound 'wide' is the Phase parameter. Again, tweak the filters to focus the sound and prevent wide mud. Used subtlety or wildly, a lot of pleasant sounds can be explored here. Which leads us too...
Not-So-Common Send Effect Madness
The Chorus becomes a fairly amazing tool once it is liberated to a Send Track. Have you ever noticed if you're using the Chorus in-line on an effect chain that the Dry/Wet slider reveals a weaker, darker sound the closer it is to 50%? Try it out. That weaker feeling is caused by a cross-fader algorithm that does not maintain equal power throughout the range. This bugged me initially, as I tend to think of chorus as an 'additive' effect: something you add to colour the sound without loosing the volume and presence of the original sound. No big problem though, because we can use the Chorus in a Send Track and use the #Send Device to control the amount of 'additional colour' without loosing the feel of the original sound.
This is where the Chorus can be used as a traditional 'liquidiser'. In this case it is best to adjust the Chorus Phase to 0 so that stereo image remains unchanged. Of course you don't have to go for traditional: you could go wild with tweaking all those parameters to get a truly mental sound. Go for outrageous amounts of Depth, Feedback and Delay and see where it takes you.
Any why limit ourselves to just the Chorus? Try out the Flanger and Phasers effects as well. These tend to work well in combination with the Chorus's Delay value use to provide a little separation from the source material. Just a little. And don't forget third party plugin effects: there are numerous 'wet' style effects out there. These include all sorts of creative modulators, spacial effects and glitchy style buffer-divisor effects.
You can really take the sounds to outer-space with creative use of the *Mapping and *Modulation devices (such as the LFO and Signal Follower). Complex modulations and combinations of effects will yield exciting results. You can use this complexity to eek out organic realism (such as analogue variability) or out-of-this-world sonic insanity. Go forth and creatively modulate!
Finally, don't forget that you can alter where the #Send Device is positioned in the original effect chain. This is another avenue for exploring creative results. An example you might have heard before in mixes involves a standard parallel reverb routing. Try setting the #Send Device to Keep Source and placing DSP effects after the #Send Device. Here you can use a Gainer and automate a fade (in or out) that will serve to bring the dry sound in and out of focus while the wet is continuous in the background. And why stop with a simple Gainer? You can put anything you have available there and effect the dry sound after the send.
Group Sends
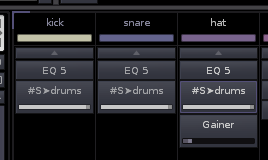
The other major way you can use #Send Tracks in Renoise is to do what some applications call 'grouping' or 'bussing'. This is where the sound of many tracks are sent to a common Send Track for group processing. This technique is usually an in-line technique, meaning that all the #Send Devices are set to Mute Source. Obviously, you can send as many tracks as you want into one Send Track, as well as send other Send Tracks into a common track for some complex summing.
The most common application for this technique is to send all the percussion sounds into one 'grouped' Send Track. Typically this is where compression, saturation and tone modifying is used to alter the percussion sound in a unified way (sometimes called 'bus compression' in analogue mixing).


One trick I like to use on lofi drum sounds is to use the Chorus as a gentle pitch modulator at the start of the group Send Track. This ideas is discussed in this thread, and the general aim is to cause a slight 'wow' tape wobble effect that make the drums feel more organic. It can really save your ears from some sonic fatigue.
Once you have a group Send Track established you can send the output of the group to another Send Track to add a little reverb or echo. Or to any other innovative Send Track you may have made up.
Group sends are a fantastic opportunity to get out the distortion, dynamics tools and filtering effects to make up some unified textures and tones. The sky is the limit with what you can do, so there's no point in me listing all the possibilities here – it is up to your creativity and what you're aiming to do.
In Sum
By now I hope you are ready to become a Send Track ninja, and apply the above to your own work. So what are you waiting for? Go back to your mixes and get creative with Send Tracks! Ideas and questions are most welcome in the comments section.
- mr_mark_dollin's blog
- Log in to post comments


20 comments