ADC Processing Delay Compensation For Audio Recording
The secret delay problem that your soundcard's company does not want to be too public about. Let us dig deeper to solve the problem. The reward: recordings that sit perfectly in your mix.
The Door Opens to the world of Digital Audio Recording...
What bliss it was when Renoise 1.8 was released! For the first time we could record audio directly into the Renoise workflow. For some of us this meant shelving other clunky DAWs and importing session recording samples, while for others it was the first time at integrating acoustic sounds with the world of tracking. Little did we all know what we were all getting into! All of a sudden we have a multitude of issues related to digital recording springing up to complicate the process. There are many great resources on the web discussing problems with digital recording: bit depth, sample rate, buffer latency, distortion, pre-amps, card quality, microphones, performance, compressor, filter and EQ qualities (see Bob Katz's audio engineering articles). We will focus on one rather mysterious problem that consumer soundcards manufacturers are trying their best to hide from you: ADC Processing Delay. A very important topic you have to understand to get your recordings to sit right in the mix.
To make sure we understand each other, let us consider the basic principles of digital audio. Sound is a vibration of air. This vibration is represented in electronic devices (such as amps, microphones and speakers) as a wave form. An electronic wave form of sound is smooth, continuous and is generally referred to as analogue audio. However, because computers deal with data built upon the basic system of 0 and 1 switching (binary), the continuous analogue audio has to be represented in a complex data stream of 0s and 1s called digital audio. This makes up all your samples and recorded takes within your music in Renoise (or any other DAW), which at some point were converted from analogue audio to digital. The audio data is processed in a number of ways and then given to an output stage to convert the digital audio back into analogue audio going to your speakers or headphones.
The above process is handled within your soundcard, specifically in something referred to as the AD-DA chip. These chips usually have two halves to them, an ADC and a DAC. ADC stands for Analogue to Digital Converter; and DAC stands for Digital to Analogue Converter. You should now be able to guess what each of those does. We are going to look more closely at the ADC for the remainder of this article, where incoming audio is processed, and then sent as data to Renoise's recording interface.
ADC Processing Delay
All electronic devices produce a small amount of delay due to processing time. The delay gets worse when digital processing is in the equation, due to the chip dealing with data in packets. Think that digital stomp box or rack effects unit pipes the processed audio through to the output instantly? Your ears may not be able to notice, but there certainly is a small delay. In ADC processing the delay is so small that some industry people will tell you that it is too small to worry about. Wrong! Who are they to tell us that we should just ignore the delay? Did anyone consider that even a small delay may present some problems? We need to know what that delay is. The ADC delay is the time it takes to convert the analogue audio into digital audio, ready to be ported around the operating system, and into Renoise.
If you are using a decent soundcard, the delay will be in order of something under 50 samples of a 44.1khz clock setting, or a similar small number at higher clock settings (48k, 88.2k, 96k, 192k etc). The ADC will always take that time amount to do the conversion. Think of a guitar note: a plucked string - it takes, for example, the ADC 39 samples at 44.1khz before the sound of the plucked string is digitally represented in the computer system.
This is not buffer delay!
Do not confuse the ADC processing delay with your card's buffer delay! This is commonly referred to as latency. The buffer can be set by the user, and if it is a decent card it is set in samples per the clock setting. So I usually run my card at 256 samples of buffering at 44.1khz. But I can make this delay larger or small as I like, and let either renoise or myself compensate for it by removing it later on (more on this later). No matter what your buffer delay, you always will have an additional (and separate) ADC processing delay. So your recording of the aforementioned plucked string will be digitally present after going through two delays: first the ADC delay, followed by the buffer delay. That means two separate problems to keep in mind!
What this means for recording in Renoise
Let me take you through a little story of my own production nightmares. I like to record analogue sounds for my music, in particular vocals and guitars. It took long time to sort out a hardware/software process to get professional quality recordings into a computer, but now with my equipment and Renoise being as good as it is with 32-bit recording I have nothing holding me back but my own performance. But, even when I would get a great take recorded I still was not quite satisfied with how the voice or guitar gelled or meshed with the backing track. It still had this subtle odd jarring feeling. After learning about the problem, I experimented with removing the ADC processing delay from the start of my recordings.
The result was incredible.
After compensating for the delay I was immediately struck by an audible improvement in sync, attack, tune, tightness and even tone of the recordings. They started to gel and mesh. I usually struggle with my vocals, often working with awkward performances. These all of a sudden sounded in tune! The human voice especially is very subtle in how it harmonizes small waveforms with existing sound. So once the ADC delay is cut, my zero-latency performance is humming nearly precisely along with the waveforms in the mix. Those few samples can make all the difference. I have quickly made up an example mp3 where you can hear with and without compensation:
ADC delay compensated audio example [mp3, 426 kB]
The first vocal phrase (apologies for the yodeling) is without ADC processing delay compensation, whereas the second is a copy of the first with the delay cut out. The difference is incredibly subtle, but important for the subconscious impression. The first floats over the top of everything, sounds OK but slightly awkward. Whereas the second in comparison is more enmeshed and in-tune with the music. It is a slight feeling of "this falls into place better". Different phrases will reveal different ways of "sitting better". And it does not just apply for voice, for any analogue source, tuned or not tuned, drone or percussive, ambient or centre stage - the sound will appear in the mix as it should, as if it appears rightly on an old analogue tape.
Anyone taking their audio recording seriously should look into compensating for ADC processing delay. If you are not convinced read on and try it out for yourself...
Every Chip Is Different: Find Out What Your Delay Is
Soundcard manufacturers usually do not post ADC processing delay specifications alongside the desirable advertised features of the product, and it is most likely they will not be made public at all. You will need to contact the technical support of the manufacturer and request the specifications of the AD-DA chip.
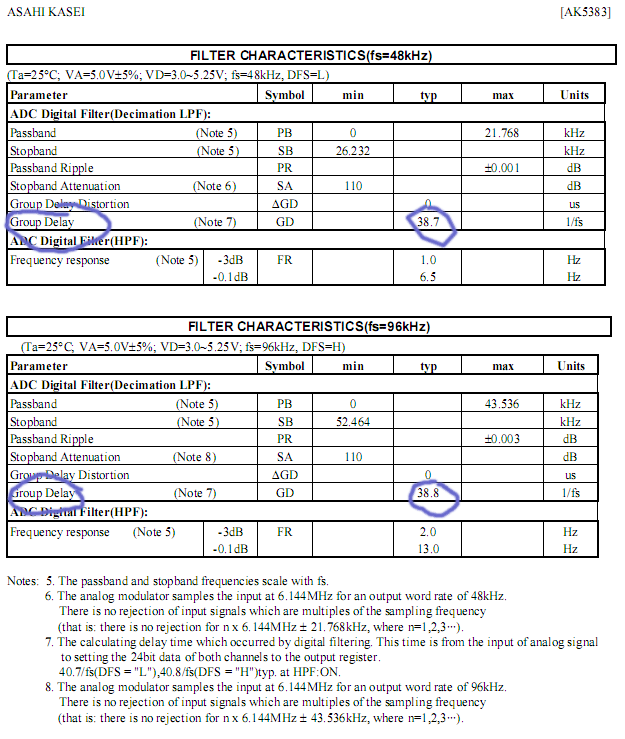
My soundcard at the moment is M-Audio's Delta 1010. I wrote to their technical support and they passed on a pdf specification sheet for the AK5383 AD-DA chip. I had to mine through the pages to find what was relevant (which is a good learning experience), and came across their term Group Delay. I have included the page here so you can see for yourself (see note 7):
For the two displayed clock settings the delay is nearly 39 samples. This is the amount I have been cutting to compensate in my audio recordings. It is the magic number as it yields the most gelled and meshed results! So now I am constantly cutting 39 samples off every one of my takes. The process for Renoise follows in the next section.
What I have Done to Compensate
Once you know your ADC's delay length you can easily use Renoise to compensate for it. This tutorial assumes you already are familiar with Audio Recording and the Sample Editor. Go school up if you have not, because half the fun of electronic composition is getting live sounds in there.
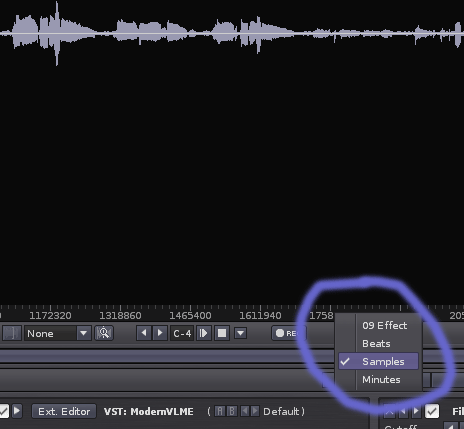
You will need to record some sounds into one of your demo songs. Any sounds will do as long as they are either in rhythm or in tune. Once you are happy with a take, look at the recording in the sample editor. You need to set one of the rulers to samples. On the following example I am using the bottom ruler, right click on the region allows you to select samples:
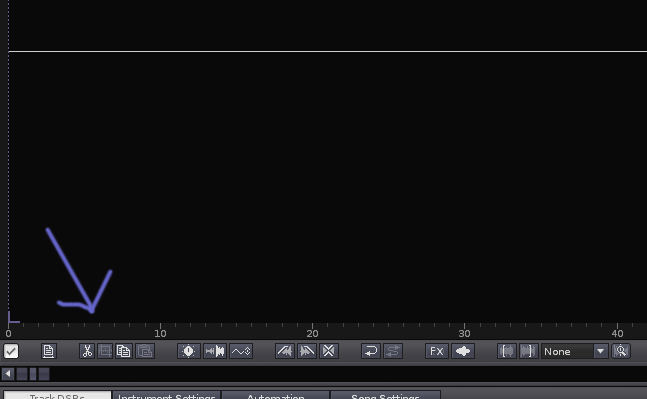
Use either the mouse-wheel or zoom buttons to zoom into the start of your recording. We are going in very close, right to about the first 50 odd samples. It is likely there will be very little data there, but that is OK:
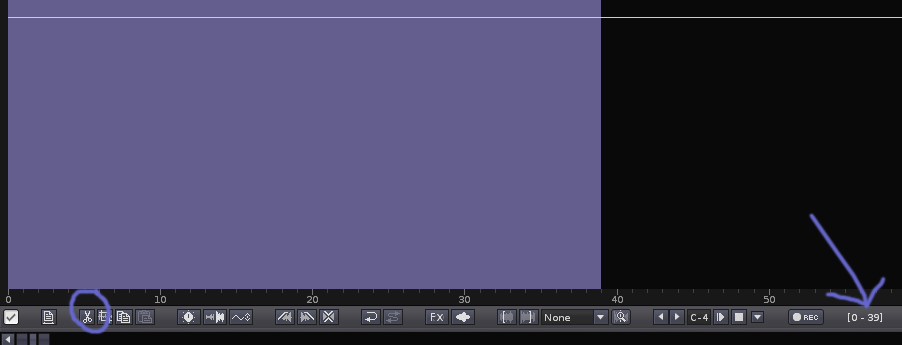
Now use the left mouse button to select the amount of time you want to cut out (whatever your card's ADC processing delay is). Because my soundcard has an ADC processing delay of around 39 samples, I am going to select and cut 0-39 (zero to 39) samples from the front of the recording, see here:
...et voilá! Play the recording with the backing track and enjoy the magical improvement!
Other Short Delays To Look Out For
Once you begin to get a feel for how things should be after compensating for converter delay, other short delays are worth considering. Some VST plugins (and some of the native Renoise effects) have very minor delays that can mess up the flow of a mix. Some are real design issues, such as Plugin Delay Compensation (PDC). Any outboard hardware that has digital processing in it (e.g. rack effects or stomp boxes) will present these same issues.
When in doubt contact the manufacturer and do your research. Your mixes are worth it.
Feature Development?
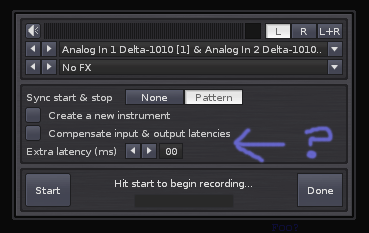
In exploring this issue I will conclude by stating that there is need for some feature development in Renoise. Given that this problem is occurring at the sample level, being much smaller than the ms (millisecond) level, there are some areas where accuracy is needed. Look at the current recording dialogue:
Currently you can only set the latency compensation in ms, not samples. If my buffer is set to 256 samples, then that does not properly equate to 6ms, thus causing sync issues after automatic compensation. If this could be set in samples then I would specify 256 samples and add my ADC processing delay amount (39 samples) to the end making it 295, for example. Currently I do this cut by hand each time, which is sometimes tedious.
Alternatively a double solution could be developed. Latency compensation can be set in samples as above, but additionally in the configuration preferences a ADC processing delay amount can be set that automatically cuts off the required amount of samples from the start of every recording.
Closing words
I will be keen to see other members of the community experiment with this issue, and if people are deriving as much benefit as I have been in their mixes. I will also start a Tips And Tricks thread to bring this to light. I am interested to see your results, so do not hesitate to comment.
- mr_mark_dollin's blog
- Log in to post comments




13 comments