Renoise 3.0: Creating a layered instrument
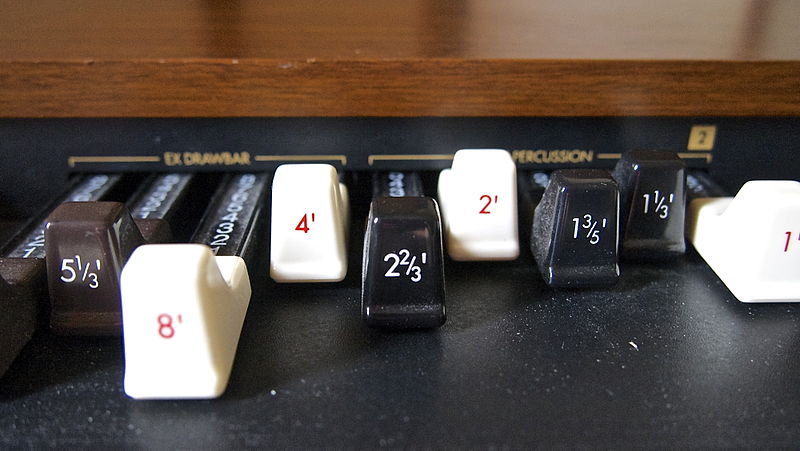
Photo by Shunichi kouroki / CC BY
In this exercise, we will recreate one of the instruments that come with Renoise 3, a drawbar organ emulation. This instrument is useful as a general purpose tone-generator, able to create sounds with a wide range of harmonics. At the end of the exercise, we should be able to control our creation via macros, too.
Note that this is not an introduction to advanced instrument-design as such, but rather a quick guide to pick up on some of the aspects of the new Renoise 3.0 sampler - the sample list/properties, modulation and macros. You could easily take the resulting instrument into new territory by adding your own effects, using an alternative tuning scheme or by replacing the individual samples.
Tip: to listen to the final instrument, you can open Renoise right away and and use the Disk Browser to navigate to the factory content (within the instrument tab). The file is called Drawbar Organ.xrni, located within the folder named “Electric”
Step 1: The fundamentals
So, we have set out to recreate a drawbar organ. In practical terms, this means stacking 8 differently tuned sinewaves on top of each other. And since this is a traditional organ-style sound, we want to add subharmonics (fractions of the topmost frequency) in the following manner:
| Layer 1 : 16 | 110 Hz |
| Layer 2 : 5 ⅓ | 322.5 Hz |
| Layer 3 : 8 | 220 Hz |
| Layer 4 : 4 | 440 Hz ← our "perceived" base frequency |
| Layer 5 : 2 ⅔ | 645 Hz |
| Layer 6 : 2 | 880 Hz |
| Layer 7 : 1 ⅗ | 1032 Hz |
| Layer 8 : 1 ⅓ | 1290 Hz |
The 1/1 ratio refers to the fundamental frequency - in this case we aim for 1720Hz - exactly two octaves above the standard base frequency of 440Hz. This will make the base frequency sit nice and comfortable as the middle 4th layer, with the possibility to add extra harmonics both above and below this tone
Step 2: Gathering ingredients
You can’t cook without ingredients, and in this case our main ingredient would be a sine-wave. Luckily, we have a instrument folder called “Elements” that contain basic sounds that you can build upon - using the ability to expand an instrument and load samples from within it, we can load the sample “Sine 16.351 Hz” from the instrument called Chip - Sine.xrni
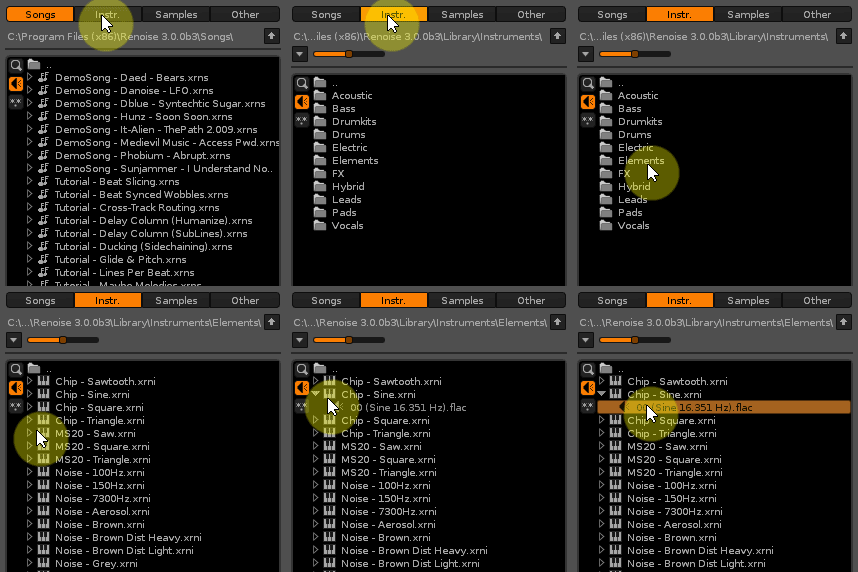
Now, if we want to be able to load the instrument into any song, it would be a good practice to settle on the standard tuning, in which the A-4 note represents 440Hz. However, the sine-wave sample itself is playing at an extremely low frequency - 16.351 Hz is well below the limit of human hearing - so we would first need to transpose the sample upwards.
In Renoise, you can transpose samples in two ways - either by tweaking the transpose amount directly in the sample properties panel, or by opening the keyzone editor and adjusting the basenote. In our case, we want to adjust the basenote via the keyzone editor - all the way down to the lowest possible pitch:
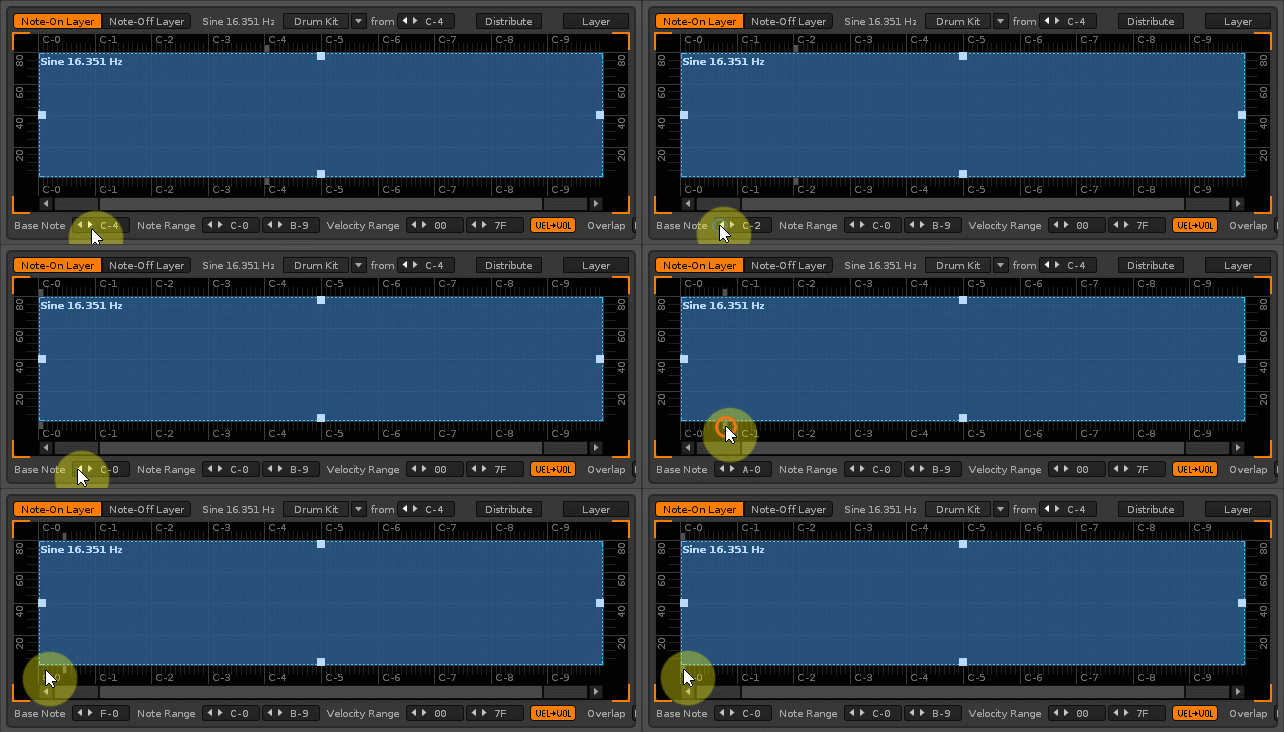
In this picture, we are using both the numeric input, and clicking along the edge of the keyzone to adjust the basenote
To ensure that our sinewave is in fact tuned to the right frequency, try playing an A-4 note while looking at the spectrum analyzer (hint: to view the spectrum analyzer, switch to the mixer or pattern editor, and click this icon in the upper toolbar: ![]() ). Being a sine-wave, the sample should produce a clear peak, as you can see here
). Being a sine-wave, the sample should produce a clear peak, as you can see here

If triggering the note at A-4 plays the sample at the 440 Hz frequency, we are ready to continue.
Note: if you had loaded another type of sample - containing more complex harmonics - it would probably be a good idea to listen closely to the sound, and then adjust the transpose/finetune by ear. Still, a sine-wave would be a useful reference - a good “tuning fork”, so to speak.
Step 3: Creating the modulation sets
Opening the modulation editor, you can quickly add 8 sets by pressing the + button, and assigning the corresponding names: 16, 5 ⅓, 8, 4, 2 ⅔, 2, 1 ⅗ and 1 ⅓. Of course, these names are just there for reference, you could leave the names to their default values too.
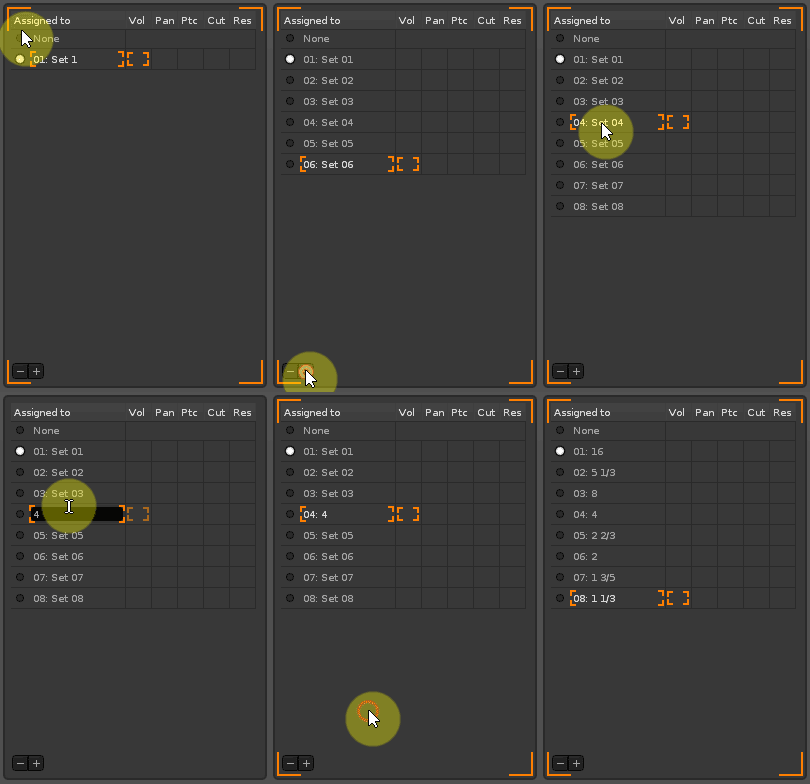
Having selected the Volume slot, we then add an Operand device...

...and use copy-paste to copy the contents of the Volume slot to the remaining sets. For copying the modulation set, we can either use the keyboard shortcuts CTRL+C/CTRL+V, or access the clipboard via the context menu (right-click)
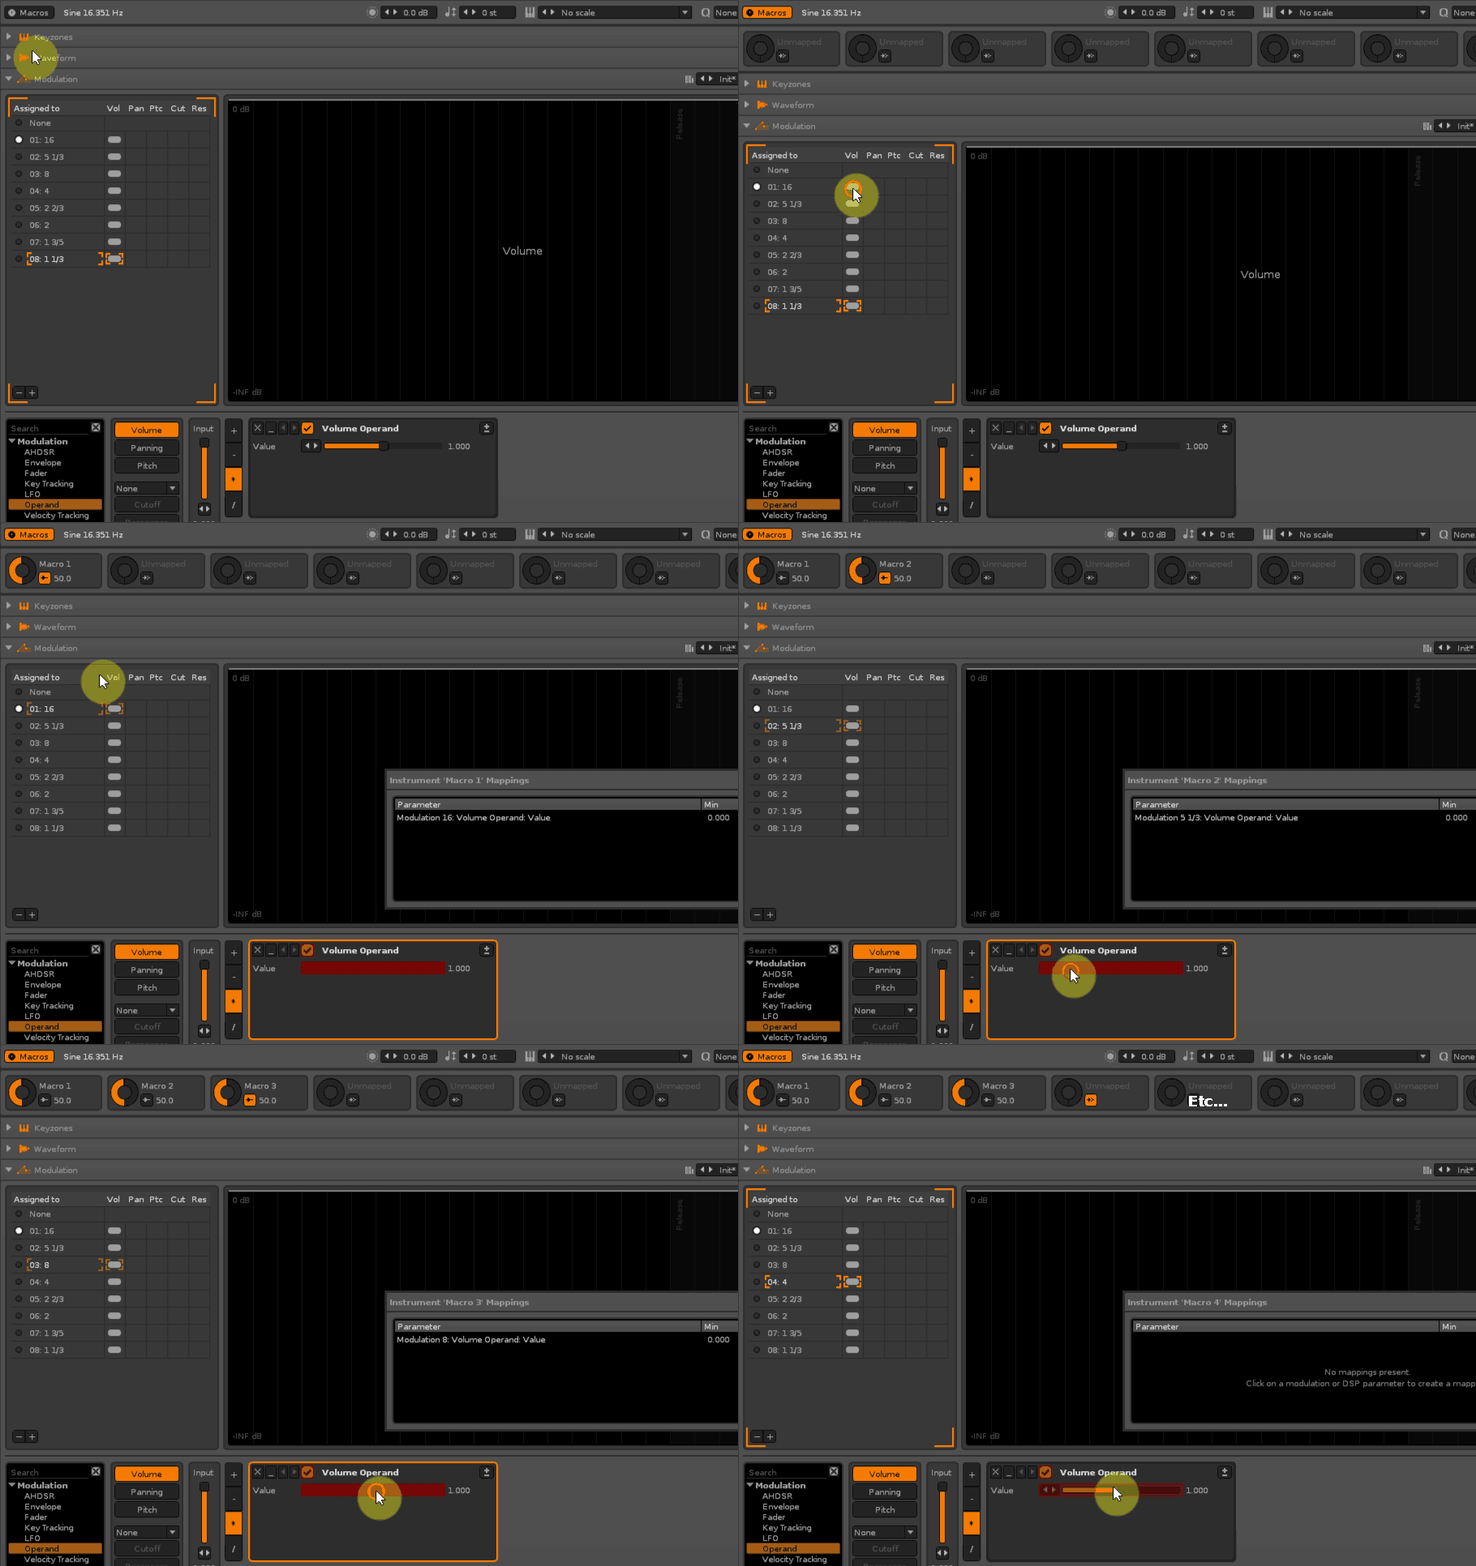
Also, we want to add macro assignments for each volume operand. This is done by stepping through the various sets in macro-assignment mode. Quickly done, although at this stage the repetition might begin to feel a bit tedious? Don't worry, we are nearly done!
Step 4: Creating and tuning samples
With our basic sample and modulation layers in place, all that is missing now are the actual samples. We will need to create copies of the original sine-wave sample, and transpose each copy according to the table of frequencies from step 1. We are certain that our original sample plays A4 exactly at 440 Hz, which makes it easy to calculate the relative transpose we need to apply to each note (you can also use a reference table such as this one if you need to look up how frequencies map to notes in standard/MIDI tuning).
| Layer 1 : -24 semitones | * Note that layer 2 and 5 does not accurately represent the pitch from the original table of frequencies, as they have been adapted to tempered tuning |
| Layer 2 : -5 semitones * | |
| Layer 3 : -12 semitones | |
| Layer 4 : 0 semitones | |
| Layer 5 : +7 semitones * | |
| Layer 6 : +12 semitones | |
| Layer 7 : +16 semitones | |
| Layer 8 : +19 semitones |
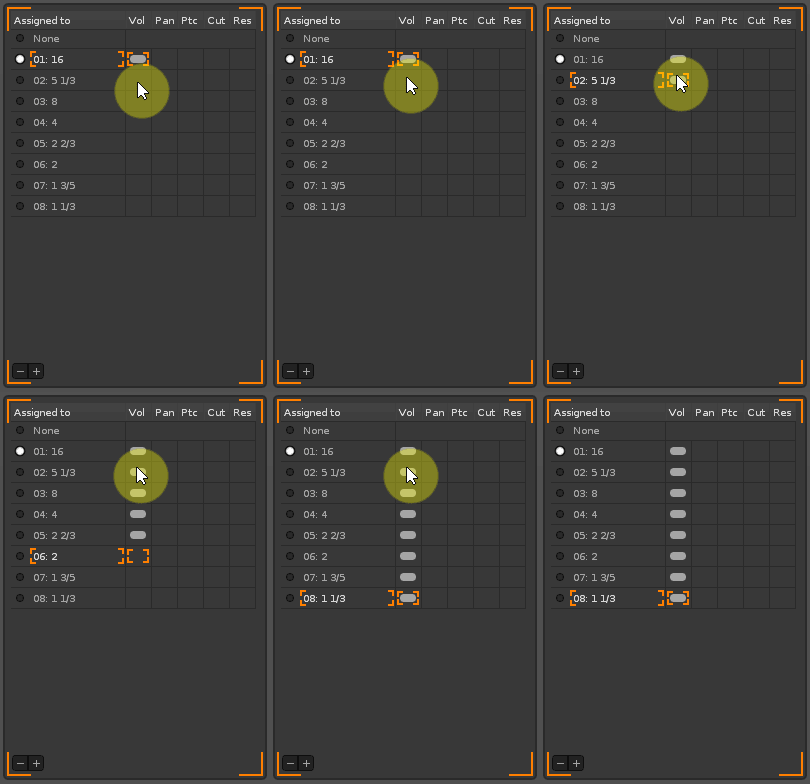
Creating the samples is done by selecting the sample in the sample-list and hitting “Duplicate” seven times (CMD/CTRL+D) - don’t forget to focus the sample list first (alt/middle-click). Be sure to follow the steps in the following screen capture: first, the basic sample is copied 7 times, then each copy is assigned to a modulation set (can be done via drop-down below the the sample list too) and finally the sample is transposed using the sample properties...

Step 5: Final steps
Now that each sample has been assigned to a unique frequency and modulation set, the instrument is practically done. You should be able to experiment with the macros to achieve various sounds and timbres (and, generally speaking, it is probably a good idea to check that each knob does in fact work, and is controlling the right layer).
Adjusting the volume of the instrument is recommended, too - playing this many sine waves on top of each other could easily get pretty loud, especially when playing chords. Of course you could just turn down the global volume of the instrument, but perhaps a better approach would be to select all samples in the sample list and “batch-apply” volume to them, using the volume value within the sample properties panel - this will ensure that you have some headroom for your instrument (it is always a good idea to aim for +0dB as the master volume, as it will make it easier to insert the instrument into a song/mix at a later stage).
And that’s it!
Congratulations on creating a layered instrument with the new sampler in Renoise. Now would probably be a good time to save your creation!
And, perhaps this exercise taught you something useful? In any case, if you know the new sampler in Renoise sufficiently well to create an instrument like this, you are well on your way to creating even more advanced instruments “from scratch”.
In the next Renoise 3.0 tutorial, we could perhaps look into creating a Doofer device, faithfully emulating a rotary speaker (a Leslie speaker). It could be combined with this instrument to create some really authentic jazz club vibes (cigarettes and alcohol not included).
- danoise's blog
- Log in to post comments


1 comment