Avoid clipping in your final mix
So you've created an absolutely banging tune and it is time to give it a final polish making it ready for mastering. But, the little clipping indicator has been lighting up while your song plays, perhaps so much so the sound of your mix sounds rough and undesirably ugly. No good in having an amazing song if the final mix sounds like a fudged up mess! It is general practice to have a really clean final mix so everything is ready for mastering (more on mastering later). This article will help you aim for a final mix that is nice and clean so it at least avoids clipping. If you follow the provided steps you might pick up on neat habits that will prevent you from sonic catastrophes in the future.
Before getting deep into this article it is best that you make sure you're fully familiar with Renoise's DSP audio mixing system, which can be found here in the Renoise Manual. If you're unfamiliar with any of the Renoise terminology used here it is always good to go back to the tutorials to brush up on some technical knowledge of your favourite music software. This article also uses a lot of common audio production terms – so if in doubt look the word up. I've linked some of the terms so you can follow up on with further reading.
What is clipping and why avoid it?

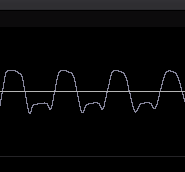
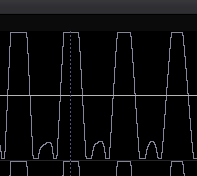
Clipping is a form of distortion where the amplitude of the waveform is attempting to be so large it runs out of room and pushes against the extreme edges of available sampling space (referred to in digital audio terms as '0dB'). Because it has nowhere to go the waveform is flattened out at the peak of the amplitude in a hard line until the amplitude lowers again and resumes its normal curve (see the two waveform diagrams below). Both the hard line and the fact that there is a tight little corner bent into the shape of the waveform contribute to audible distortion. The sharper that bend and the longer that line is straight the harsher the sound of the distortion. If you'd like to know more about the technical background to clipping and distortion, start reading here.
This is a healthy looking waveform. Plenty of headroom here. But look at this one:
This waveform has been clipped. It is the same sound as before but with +12dB added. You can see the edges have become squared.
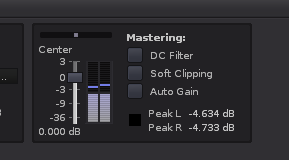
This of course is sometimes a desirable sound effect, but for the case of making a very clean final mix on your song it is not desirable. Not only can clipping sound ugly, it can prevent a good result in the mastering process later on after the final mix is done. Why is this so? Mastering initially requires the final mix to have at least some 'headroom' to work with. The room to move is needed when applying further effecting to the waveform, which is commonly further boosting the amplitude. Headroom is the amount of space left between the loudest peak amplitude (say -4dB peak) to the absolute edge of the digital audio envelope at 0dB. If your mix 'peaks' at -4dB, that means you have 4dB of headroom, and probably ample space for mastering to do its job. In case you haven't figured it out by now all the loudness values in digital audio are expressed in negative dB. -4dB is quieter than 0dB. Look at the following example:
If your own mix has peaked at 0dB and the clipping light has turned on, then you have distortion and no headroom left for mastering. Time to rethink the plan!
Ideal master channel settings
Doing mastering for clients over the years has allowed me to see some pretty varied use of the settings on the master channel, and some songs have been downright wacky! So, I've developed settings and a method that helps prevent mix clipping and leave a usable amount of headroom. First, let's look at the Track DSP strip for the master channel (Mst):
Take a look at the settings in this image. Don't worry too much if you don't know what every single thing here means, we are only examining the chosen settings for this task.
Let's go through each relevant setting: Panning is centred so that nothing is pushed unevenly out to any of the sides. Pre-fader volume is set and fixed to 0dB (very important!). The Width is not used at all because we don't want to introduce strange short delays to the mix and muck with the stereo image. The post-fader is set and fixed at 0dB (again very important!). DC Filtering is off because it's better to clean up the low end frequencies selectively in the mix. Soft Clipping is off for two reasons: one is that we don't want to hide the fact that the mix could be clipping; the other reason is we don't want any subtle alteration over the entire mix potentially colouring the peaks in an undesirable masking manner. The Auto Gain is off so that Renoise is not altering the post-fader volume behind your back, thus making any potential clipping appear straight away. Overall this approach is very transparent – letting you hear the mix as is without any alteration.
I can hear some of you say "Hold the bus! I don't set up my mix this way" Well, that's ok, but if you want to get a very clean mix without clipping this is the best way. It may now become apparent your song sounds too quiet... Well, time to turn up your monitors! This brings up a wider issue about monitoring.
How to set up your monitoring levels
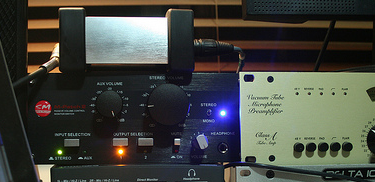
You may have heard of the term 'bit-perfect', and if you would like to learn more about bit-depth issues you can delve into the subject here. Without heavily going into the details it is important to adjust your playback volume of your monitors (speaker or headphones) using an analogue fader, not a digital one. This means your soundcard channel volumes (if the card has a software mixer) all have to be set at 0dB. This will prevent bit-level degradation to the sound. Some people's studios have an amplifier or hardware mixer connected to the soundcard output before it goes the monitors – adjust the playback volume there. Similarly, if your monitors are active and have rear attenuators, you can adjust the playback volume that way. Or, you can do what I've done and get a passive analogue volume knob that sits between the soundcard output and my active monitors (see picture below of my big knob!). Whatever method you choose, it will sound better if you're adjusting the playback volume with an analogue fader – digital adjustment isn't bit-perfect and can kill representation of dynamics at settings other than 0dB. If all of this sounds a bit too daunting for you then you can just adjust the master output fader on your soundcard, and make a project of later on getting an analogue fader to do that job properly.
The other major point with ramping up your monitor playback volume is that you might use your computer system to play things other than your Renoise mixes – for example: mp3s, DVDs and CDs. These might now sound just way too loud! What to do? Because you're using the master channel settings I outlined earlier your mixes will sound loud enough, but anything that has had commercial mastering done on it is going to sound way too loud. So, you'll need to roughly decide on two monitor playback volume settings, each depending on what you're doing at the time. This is where having an analogue fader is really handy – I put mine at 11 o'clock for listening to CDs, and way up to 2-3 o'clock for working on final mixes in Renoise. Your settings will be relative to what gear you have.
Commercially mastered material has boosted loudness, sometimes excessively boosted (so much so that they've given a name to the phenomenon: The Loudness War). I want to stress that a final mix of your music in Renoise is not as loud as commercially mastered audio. Do you remember from before that a final mix needs to avoid clipping and have some headroom? This is why you will need two different settings for your overall playback volume – a louder setting for working on mixes, and a quieter one for playback of commercially mastered audio.
Final mixing – avoiding clipping
So you've got this far and set your master channel for clean uninterrupted output, and you've set your overall playback monitoring volume level suitable for working on a clean mix with headroom. How do you avoid clipping? Initially this may seem as simple as 'turning down the volume' on individual channels – but more it is more likely there are other elements you can fix up with more precision. What are some of the common things that cause mix clipping, and what can you do about it?
Excessive bass frequencies are almost certainly the number one culprit of causing mix amplitudes to be so high they are clipping. There is a whole separate art form of getting a final mix tonally right so there are not any excessive frequencies in any area. We'll look at aspects of this in future articles. Another related issue is the need for accurate monitoring – having speakers that represent all the frequencies in an honest way (which is yet another topic we'll look at later). The general point though is lower frequency sounds require more amplitude to express themselves and be heard on an equal level (see the Fletcher-Munson Curve for an explanation). Because of this need for equal expression, bass frequencies can quickly get out of hand and excessive. You may need to give attention to those frequencies by closely EQing sounds like kicks and basses. Reducing low end, especially sub-bass frequencies in sounds where they are not needed will also help clean up the mix and avoid needless excess in amplitude.
Way too much booty!
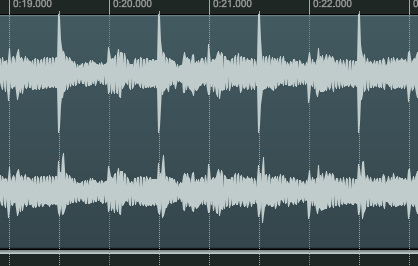
Snappy large transients of a quick nature can also 'spike' through your mix and cause unnecessary clipping. What is a transient? Take a look at a the waveform of a snare sound – the transient is the part of the sound where it is the most 'spiked' – a quick transition of sound having a peaking percussive quality to it. Transients are very common in percussion sounds, but can also be found in snappy sounding instruments like funky guitars or plucked synth sounds. These quick sounds can sit above the rest of the mix sounds, and sometimes so much so they cause clipping. This can be remedied in a number of ways. One way is to apply gentle compression that addresses the excessive part of the transient. Compression using a shorter attack in order to be quick enough to catch the spike will make sound 'behave'. Another way is to apply very gentle and light digitally emulated saturation on the transient sound, which will reduce the snappy dynamics of the sound. It goes without saying that compression and saturation can be overdone, and that's something I'll cover in detail with future articles.
There be some stray transients going on!
Summing up...
In summary: if in doubt reduce something! You may find yourself reducing just about every channel in your mix to get some reasonable headroom happening. Sound too quiet? That's ok, just turn up your monitors! The more you work according to this method, the more confident you'll get in making a slick and clean mix without clipping. You've got at least 24 bits of data resolution to play with to express all your dynamics, around -144dB worth of dynamic range! That is a lot, so use it! No point in slamming it all up near 0dB risking clipping. Some quieter styles of music don't even peak over -6dB in their final mix.
I've made up an example XRNS file that's at the final mix stage. To play this file you will need at least Renoise 2.5. It will show you an example of a simple clean mix without clipping, and you can use it as a benchmark to set your playback monitor levels. It is also an example of a neat final mix that is 'ready' for mastering. So, it won't sound 'done' because that's what the mastering achieves.
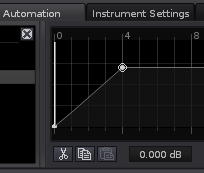
The example song also shows a little use of the master pre-fader for the purpose of a fade-out (see the last pattern). If you songs need to use a master fade-in or out, then automate the pre-fader on the master channel up to or down from 0dB. That way, for the bulk of your song it remains uninterrupted at 0dB. So make sure that your automated maximum points are precisely set at 0dB.
Whether you're going to do the mastering yourself later on, or passing the song on to a mastering service – you now have a good idea how to complete a final mix without the major sonic disaster of clipping. The cleaner and better presented the final mix is, the easier and less destructive the mastering will be. Good luck! And if in doubt, share your mix with the Renoise community and you'll surely receive some great tips and feedback.
- mr_mark_dollin's blog
- Log in to post comments






30 comments