Forum
Best Mini Midi Keyboard for Renoise with Linux?
Hey there,
I am a beginner with Renoise and want to choose a new little Mini Midi Keyboard. Which Keyboard Models have advanced Support with Linux and Renoise?
1 post - 1 participant
I have windows 11 pro, startup problem renoise, keep searching for vst
Good morning dear people.
Yep I’ve been trying to start renoise for some time now I’m also reinstalling it but keep trying vst, searching on the disk how long does something like that take. is there something I need to change. are there people with experience with this problem.
if anyone knows the cause and a solution, I’d like to hear it, kind regards marc de zeeuw
1 post - 1 participant
Trigger notes/ samples with LFO?
Trigger notes/ samples with LFO ? I have been scratching my head on how to do such a thing. This is a common technique in modular of course, Bastl Kastle comes to mind. Any suggestions would be much appreciated.
1 post - 1 participant
How to get akai midimix buttons to light up on Renoise on cue?
hi, i have an Akai MIDIMIX - it’s pretty neat.
apparently some of the buttons can be made to light up.
what’s the direct method for getting a button to light up from Renoise - please don’t tell me “Duplex”. i need the simplest method of getting one to light up.
1 post - 1 participant
Сonsole for quick mixing
Hello Folk!
Made a small effect from native processing in the spirit of a mixing console with vintage sound and regular. I’m interested in your opinion.
JLX_CNSL_.xrdp (7.8 KB)
JLX_TAPE_.xrdp (9.2 KB)
the idea is quite simple combination of effects for a quick mix
Cheers!
1 post - 1 participant
Blastbeat tips?
Bit weird i know, but would anyone have ideas or tips for programming blastbeats in renoise?
1 post - 1 participant
The Prodigy's Android reworked/retracked in Renoise
video: https://www.youtube.com/watch?v=6qe6IIrltaE
mostly done for my own remixing purposes but i want to release it aswell
(pub)-Android_I.xrns (3.6 MB)
1 post - 1 participant
Ysfx - Reaper JSFX plugins as VST3 for Renoise in Linux
So…just stumbled over ssth I wanted to share. Thought it might be a nice inspiration for some, like playing around with new sounds and toys always brings up fresh ideas. For free!
So in the Reaper system there is an audio scripting language called JSFX. Now this is Reaper-internal, and people can program DSP code in a simple Javascript-like language, to have them compiled and running inside Reaper. There are already quite some nice synths and effects around, you can use them all for free and even mess with the code. It is also thought for plugin development rapid prototyping - nice tool overall.
There’s a project called “YSFX”, which enables loading these plugins as VST3 plugins! Nice thing I thought, compiled it, but it didn’t quite work, it’s an old version w/ too many bugs.
Searching on, I found Joep Vanlier’s Github, who not only has some very nice JSFX synths and effects going, but also a patched version of ysfx in his repo. I just tried compiling it, all of his own synths and effects and also that of others seem to work in Renoise on my KUbuntu 24.04.
The plugin compiles as VST3 effect and instrument each, and I was able to load it into renoise and use it. You have a loading bar in the gui at first only, but hitting the “load” button, you can just point it to the JSFX file of a synth/effect, and it will load and run it!
There seems to be no binary releases, you need to build it yourself. Here is what I did in a nutshell, maybe you need to install some more packages or do different steps in another version/distro of Linux. Please drop a comment if you find you’d need more packages or have other info.
First you need the build environment going, i.e.
sudo apt install build-essential cmake gitThen you need to install the dependencies for the JUCE library used by ysfx
sudo apt install libasound2-dev libjack-jackd2-dev \ ladspa-sdk \ libcurl4-openssl-dev \ libfreetype-dev libfontconfig1-dev \ libx11-dev libxcomposite-dev libxcursor-dev libxext-dev libxinerama-dev libxrandr-dev libxrender-dev \ libwebkit2gtk-4.1-dev \ libglu1-mesa-dev mesa-common-devOkay let’s start building, go to your Source compilatin directory, and download and compile the software
(remember to use the github from “JoepVanlier”, and not from “jpcima”, it has the proper patches, the other is outdated!)
…can also use “RelWithDebInfo” instead of “MinSizeRel”, to get it debugging ready in case you want to hack it and/or try developing JSFX plugins.
After the last command finished, I had the vst3 plugins installed in “~/.vst3”, and renoise could scan and load them just fine. Now you just need some JSFX file - just download and extract the following respos somewhere, and load the .jsfx files from the ysfx plugin to get the plugins going. No need to compile them.
Here are some repos (from Joep ysfx readme.md):
Saike: https://github.com/JoepVanlier/JSFX
Geraint Luff https://github.com/geraintluff/jsfx
tilr JSFX: https://github.com/tiagolr/tilr_jsfx
Mawi JSFX: https://github.com/mawi-design/JSFX
Justin Johnson: https://github.com/Justin-Johnson/ReJJ
Tukan Studios: https://github.com/TukanStudios/TUKAN_STUDIOS_PLUGINS
Jozmac: https://github.com/jozmac/reapack-jm
JClones: https://github.com/JClones/JSFXClones
Sonic Anomaly: https://github.com/Sonic-Anomaly/Sonic-Anomaly-JSFX
Especially the Saike plugins and the tilr are really good, the others probably also worth some play. Some are cheesy or subpar, like simple DSP, but others are good and bring some stuff that Renoise does not provide, like synthesis, different FM filters, physical modelling, FM etc. Only downside is, the system uses quite some CPU power - the code has only little optimizations it seems. Still it may be interesting to find new sounds, and you can resample them in renoise just fine for sample genration. You can easily hack these plugins to adapt them (if you know how hehe!), or even you can explore some DSP programming on the fly like with Protoplug can do with LUA. And after all it’s for free…!
If you can make a walkthrough to get it compiled and running for free on windows, please comment below! Have fun playing around with the JsusFx Y’all †…
2 posts - 2 participants
Suggestion: Filter device
There is this post here from many years ago: "Hidden" Vowel Filter Device!
and I recently talked with someone about it.
On the same note, I think from a user perspective it would be better to have only one filter device, then be able to select analog or digital or any kind of filter type within that one device.
So why not clean that all up and just make a single filter device with all the options.
Digital, analog or “hidden”.
I think that would be a good improvement over hopefully little work.
Warmest regards, Aaron.
1 post - 1 participant
If you think, Trackers are not complicated enough #Strudel
This thing here called Strudel is coding/producing in one box.
strudel.cc Strudel REPLStrudel is a music live coding environment for the browser, porting the TidalCycles pattern language to JavaScript.
This is so weird.
1 post - 1 participant
Sample ''Ticking''
Im noticing that when my sample loops it seems to ‘‘Click’’ as it gets to the next pattern… Anyone know any tricks or tips that can help that? Im thinking filters but yeh… thanks!
3 posts - 2 participants
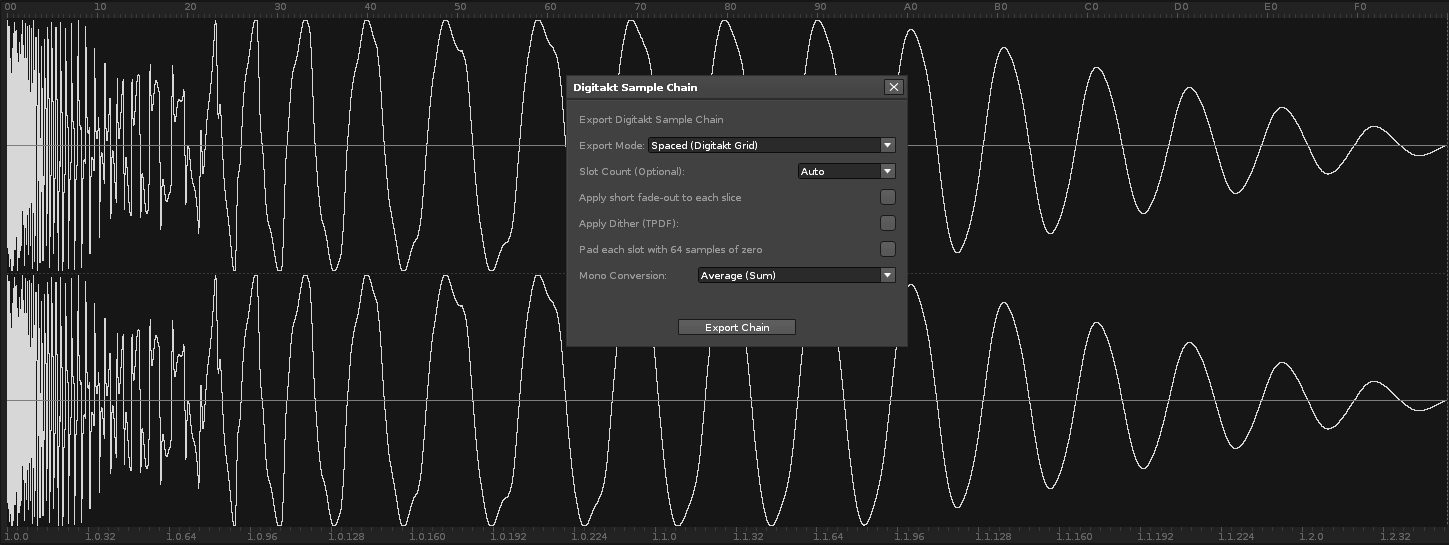
New Tool (3.4) Digitakt Sample Chain
Renoise tool designed to export selected instrument samples into a single, monophonic WAV file, formatted as a sample chain suitable for Elektron Digitakt.
Features- Export Modes:
- Spaced (Digitakt Grid): Exports samples into fixed-length slots, ideal for Digitakt’s sample slicing grid. You can choose from “Auto” (slot length based on the longest sample, adjusted to fit all samples into a specified number of slots) or predefined slot counts (4, 8, 16, 30, 32, 64).
- Chain (Direct Concatenation): Exports samples one after another without forced padding, creating a continuous audio stream.
- Mono Conversion:
- Average (Sum): Converts stereo samples to mono by averaging the left and right channels (default).
- Left Channel: Uses only the left channel for mono conversion.
- Right Channel: Uses only the right channel for mono conversion.
- Audio Processing Options:
- Apply Short Fade-out: Adds a small fade-out to the end of each exported sample slice to prevent clicks.
- Apply Dither (TPDF): Applies Triangular Probability Distribution Function (TPDF) dither when converting to 16-bit, which can reduce quantization noise.
- Pad each slot with 64 samples of zero: Adds a short silence at the beginning and end of each sample slot in “Spaced” mode.
- WAV Export: Exports standard 48kHz, 16-bit mono WAV files, optimized for Digitakt import.
- Duration Info: Displays the length of individual slots and the total chain duration after export.
- Select an Instrument: select the instrument containing the samples you wish to export as a chain.
- Open the Exporter Dialog:
- Sample Editor > Export Digitakt Sample Chain
- Configure Export Options:
- In the dialog box, choose “Export Mode” (“Spaced” or “Chain”).
- If “Spaced” mode is selected, choose your preferred “Slot Count” (“Auto”, 4, 8, 16, 30, 32, 64).
- Select your “Mono Conversion” method (“Average”, “Left Channel”, “Right Channel”).
- Check or uncheck the options for “Apply short fade-out”, “Apply Dither”, and “Pad each slot with 64 samples of zero” as needed.
- Export the Chain:
- Click the “Export Chain” button.
- You will be prompted to choose a filename and location for your exported WAV file.
- After export, the dialog will display the duration of a single slot and the total chain duration.
com.david303ttl.DigitaktSampleChain.xrnx (18.2 KB)
1 post - 1 participant
Concern about UltraDAW
I’m aware there’s an existing thread, however I think based on the experience I’ve had so far, the fact that that thread is locked and the developer continued to urge people to “not talk about the software here” seems strange to me.
So, to be clear, I am not trying to cause alarm and accuse the developer of malicious intent. But I am here to raise awareness and document my experience so far, so anyone else may also proceed with caution about this software, as I have decided not to even run the executable on my PC yet at this point after the experience I have had so far.
So what actually happened?
An old tracking friend of mine (Shoutout you know who you are, the dude who always sends me links to plugins on sale) mentioned UltraDAW to me and I looked at it and I was like “Holy shit, this is like Renoise but with full audio tracks, what I’ve always wanted!”. So I was understandably excited about the software. I also read his intro/manifesto and really resonated with that. I also thought the other software he developed sounded interesting.
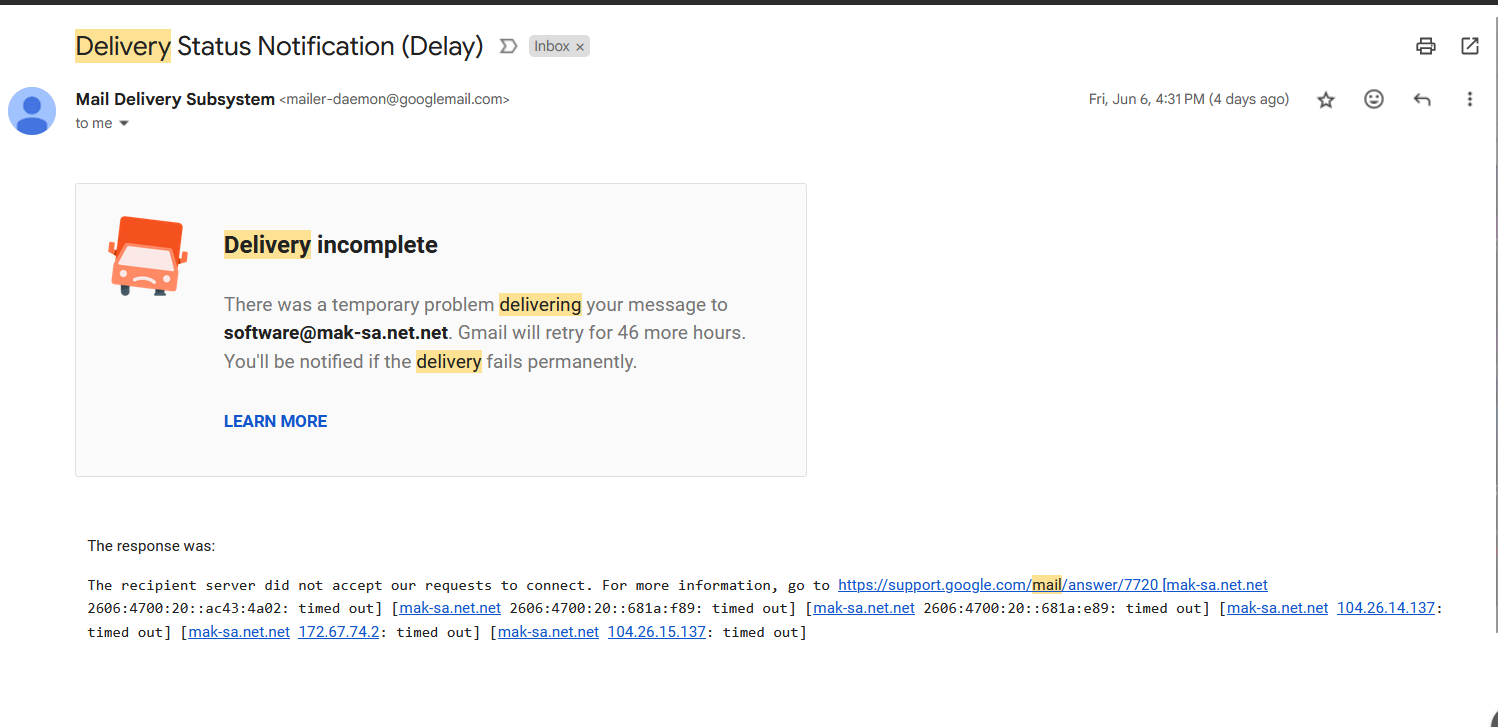
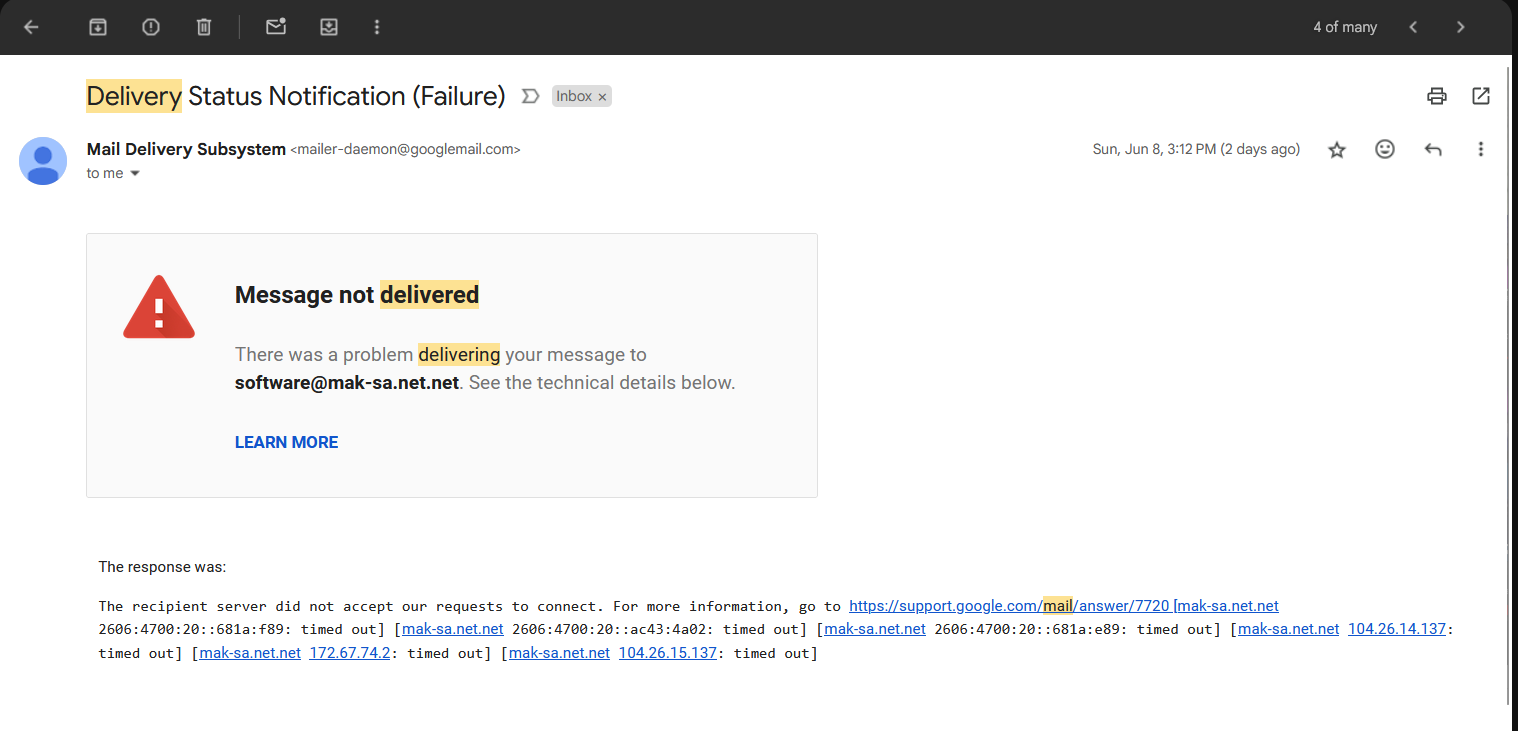
So I actually decided to try his sample browser Wavetronic first, and it was flagged by Windows Defender on my Windows 10 install (This was last week, I’ve actually since wiped my system drive and installed Windows 11 finally). I attempted to send the developer a detailed email explaining that this happened, so he would be aware of the situation. However the email never went through.
Again, I am not accusing anyone of any wrongdoing, but right now there are some unsolved mysteries surrounding this and personally I do not feel comfortable running any executables from this developer until there are some explanations.
For full transparency and documentation, I will paste my email to him below, and I will also include parts of the mail delivery subsystem delays and failures.
Initial email from me to UltraDAW developer:
Re: Wavetronic was flagged by Windows Defender organicio@gmail.com Thu, Jun 5, 2:39 PM (5 days ago)to software
Sorry, I hit send too soon! I discovered your software today. As a long time tracker/Renoise user but who is also working with lots of audio tracks lately, I’ve been wanting something like UltraDAW for a long time. I’m also interested in Wavetronic and maybe the other tools as well. I was going to try Wavetronic, but it was flagged by Windows Defender as possible malware. Here is the screenshot:
I thought it would be important to tell you. I doubt you’re trying to give us malware, but it’s still concerning for the average user and should probably be avoided if possible.
Once I get a chance to test out UltraDAW, if the workflow is as smooth as it looks like it’s going to be from the screenshots, I will definitely be contributing $ to the project. I 100% support something like this, it’s been needed for ages and there’s no better time than right now!
Keep up the great work
-Scott
Mail delivery subsystem info:
2 posts - 2 participants
Renoise lag after reinstallation
The problem is not with my computer!
Hello whoever is reading this. So basically I was using renoise as normal, and all of a sudden it just starts to lag (like fps drop), my cpu usage is completely normal (1%), RAM usage is great too. I tried to reinstall it, deleted all files and folders associated with renoise, and finally reinstalled renoise. It worked as it should, nothing lagged, everything was fine. After 10-15 it suddenly starts to lag. I had 0 tools installed, 0 vsts enabled, nothing, and it just drops fps.
Maybe someone had the same problem? How did you fix it?
If you need more informaiton hit me up.
8 posts - 3 participants
Which Mini Midi Keyboard can I choose for Renoise with Linux?
Hey there,
I am a beginner with Renoise and want to choose a new little Mini Midi Keyboard. Which Keyboard Models have advanced Support with Linux and Renoise?
These Models I choosed but dont know if they Work with Renoise and Linux. My Budget is about 100 Euro for a 25 keys keyboard. And I want to choose 25 Keys because of problems with space.
- Arturia MiniLab 3
- M-Audio Oxygen 25
- Novation Launchkey Mini 25 MK4
Or are other Keyboards better? And why? Have you got Experience with Linux and Renoise?
Greets
1 post - 1 participant
Is there a free vst tr-909 link on internet (demo) that you can use in renoise
Hi I have a question I use vst plugin with renoise, I also had a good tr-909 drum kit, which I could load with renoise. and which I also downloaded for free. I can no longer find it on the net because I have completely emptied my computer or at least not the right one. Does anyone know the vst tr-909 free download and which can also be used in renoise, I have a Nektar Impact Lx 61+ syntersyzer piano drum machine, with 8 mapd maps, so that if you have rhythms in 8 groups like in tr-909, you can switch live. Please advice or a good link
Kind regards Marc de Zeeuw
1 post - 1 participant
ChipNomad Tracker
ChipNomad devlog and first alpha
github.com GitHub - Megus/chipnomad-tracker: Chiptune tracker for handheld consoles like...Chiptune tracker for handheld consoles like Anbernic RG35xx
1 post - 1 participant
CopyPaste tool to exchange Renoise patters in friendly format
Hi everyone,
I’m working on a tool to make it easier to copy and paste patterns from and into Renoise using a more human-readable text format.
The end goal is to support relatively complex format, cover more internals through the API and make it AI-friendly — meaning it’ll be easier to edit manually or generate variations using tools like Claude or ChatGPT.
Right now, when you copy a selection from Renoise, you get XML, which isn’t ideal for human editing or AI processing. And it’s hard to paste variations back into Renoise.
This is still very much in the brainstorming/early development phase, and I’d really appreciate any feedback or ideas!
Here’s the alpha version — a simplified first step just to get something working:
GitHub - psychedel/Renoise-CopyPaste: Copy Paste Tool for Renoise
I’m both Lua and Renoise newbie - so it can be quite a ride!
Thanks!
1 post - 1 participant
Default view after starting Renoise (Disk Browser)
Somehow the disk browser is not activated when I start Renoise and I first have to make it visible by clicking it or by restoring my default view preset. Is it off by default?
5 posts - 2 participants
Repeater sort-of bypasses with MIDI Sync In
When Renoise’s MIDI Sync is set to Internal, or to MIDI Sync In with no clock coming in, Repeaters work as expected.
When Renoise is fed a MIDI Clock, they produce a weak, fuzzy effect which does not persist when the source audio dies away. This happens on both Line sync and Repeat sync Repeater settings.
I’m syncing with SooperLooper, which I have noticed causes Renoise’s tempo to fluctuate by 1 BPM up or down even after they’ve been synced for a while.
Is this an issue with SooperLooper’s clock?
3 posts - 2 participants