


Recent comments
-
Apr 9 2017 - 01:38lacuna (not verified)on
-
Nov 13 2016 - 08:28apanloco (not verified)on
-
Nov 6 2016 - 10:57leondustar (not verified)on
-
Oct 30 2016 - 01:36Marcelo Carneiro (not verified)on
-
Apr 10 2016 - 05:16Marcelo Carneiro (not verified)on
-
Jan 8 2016 - 21:28on
-
Dec 22 2015 - 18:51abel (not verified)on
-
Oct 4 2015 - 20:49eddy2508 (not verified)on
Blog categories
Groovy bassline in less than 5 minutes
This tutorial covers the 2nd half of the Renoise Workflow video. We will continue where we left off, about 4 minutes in the video.
Layering a looping sample
Right now we have created a beat from one-hit samples. We are going to spice it up by layering a breakbeat. Load breakApache.xrni from the pre-installed Instruments library (eg. C:/Renoise/Instruments/). It is not the same as Neil's one, but it will work out fine. Put a C-5 note in a new Breakbeat track. When you play the pattern the breakbeat sounds continously at a much too high pitch.
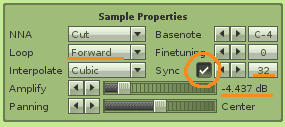
We need to modify this Instrument's Sample Properties to sync it with the rest of the song. You can see that Loop has already been set to Forward, which is why the sample repeats over and over. We need the sample to loop over 2 bars, so the Sync value of 32 is already correct. You just need to enable it. Push the breakbeat slightly back in the mix by lowering the Amplify value to about -4 dB.
Finally, Neil adjusts the bassdrum track to match the breakbeat (eg. notes on lines 00, 10, 16, 22, 26 and copied to the 2nd half of the pattern).
Installing a VSTi plugin
Moving on from the beat to the bassline. Instead of using a sample we will use a software synthesizer, more specifically a VSTi (Virtual Studio Technology instrument). Neil has the commercial reFX Beast, but to prove you can get fine results with even the simplest of VSTis, we will play around with the free Chip32.
- Chip32 for Windows
- Chip32 for Mac OS X (contains both VSTi and AU - use the VSTi)
- Chip32 for Linux
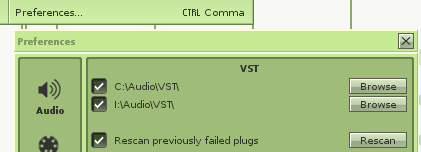
Before you can use VSTis, Renoise needs to be aware of them. After you have placed the VSTi files in a subfolder, you need to set-up VST directories in the Preferences pane in the Edit menu.
Installing and using Plugins is explained more thoroughly in the Renoise Tutorials section: Using Plugins. If Renoise has trouble finding Chip32 on Linux, consult: Setting up Linux.
Groovy bassline with Chip32
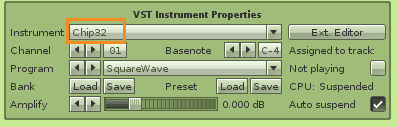
Select a new Instrument slot to load Chip32 into. The Instrument Settings has a VSTi Properties section, where you can select Chip32 from the dropdown list.
For the bassline we will repeat the bar below in a new track called Bassline.
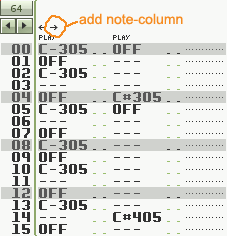
Note that this Bassline track has 2 note-columns, allowing you to trigger multiple notes at the same time in a single track. This is especially useful for portamento (or glide) instruments to emulate pressing keys while holding another. Chip32 however does not have portamento, but there is another benefit: you can easily modify the accent notes on the 2nd column.
What about the note-OFFs? If you compare a note in the pattern to holding down a key, causing a sound to play continuously, a note-off is releasing that key again. After a note-off an Instrument may immediately stop, fade-out or do something completely different. The SquareWave preset of Chip32 simply mutes. Enter the appropriate note-offs with CAPS-LOCK for a staccato bassline.
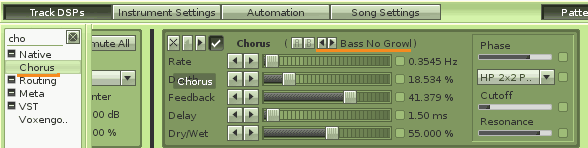
Fattening the bassline with a Chorus device
We need to compensate for Chip32's lack of fatness. In the first half of the video we added an EQ device, now add a Chorus device from the DSP list in the TrackDSPs tab. You can experiment with the Chorus presets until you get a bassline that sounds a bit like Neil's.
Automating a VSTi slider
Most VSTis have sliders, knobs or other controls. Open Chip32's own interface by double clicking on the Instrument or in the VSTi Properties.

The rightmost slider is linked to a lowpass filter. If we increase the filter, the sound becomes muffled. Try moving the slider while the song is playing. We can record slider movements and play them back later. This is called automation.
To automate a VSTi we need a special device: the *Automation Device. Add one to the Bassline tracks's DSP Chain.
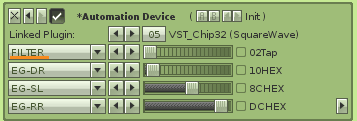
Since there is only one VSTi, the Linked Plugin value is automatically correct. The drop-down lists correspond to the controls (parameters) of the plugin. Set the first dropdown to FILTER. Moving the slider next to it will also move the slider in Chip32's interface.
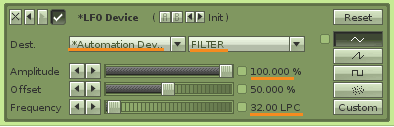
The *Automation Device in turn can also be controlled. Add an *LFO device and set-up the correct destination device (*Automation Device) and destination parameter (FILTER). Maximize the Amplitude and double the Frequency to 32 Lines Per Cycle. Chip32's filter silder will now move without your help.
End of the video
The video has ended, if somewhat abruptly, and we ended up with a great starting point for a new song. In less than 10 minutes we have created a fat beat with a VSTi bassline buttered up with chorus and channeled through a lowpass filter connected to an LFO.
Credits to Neil 'Celsius' Gaeggeler of Shaper for creating the original video tutorial.

PS. Part 2 might be missing, but rumor has it Neil will do a new tutorial video.
- bantai's blog
- Log in to post comments
3 comments